
A lineup of early Heinkel jet aircraft - HE-162, HE-280, HE-178
|
|
|
|
|
|
|
|
| Heinkel HE-162 | Dragon/DML |
|
|
Open engine pod 2 tail types |
Eduard photoetch | 6 |
A lineup of early Heinkel jet aircraft - HE-162, HE-280, HE-178
|
|
|
|
|
|
|
|
| Heinkel HE-162 | Dragon/DML |
|
|
Open engine pod 2 tail types |
Eduard photoetch | 6 |
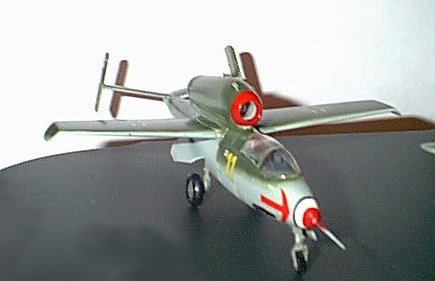
The He-162 has been a favourite of mine since I first saw it. There's just something in the way it looks that's caught my interest and kept it. When I was finally able to get a good model of this aircraft, I leapt at the chance.
The Dragon kit is a reboxing of the DML kit, sans any metal pieces (such as the landing gear,) though it does include photoetched detail pieces. Moulded in the usual light grey plastic, it seems to be well detailed and includes finely scribed panel lines - not to mention appearing rather small in the box. It gives you a few options, such as closing the engine nacelle on top of the fuselage or leaving it open to display the well-detailed BMW jet engine, opening or closing the canopy (though it's clear enough that you won't lose any detail with it closed,) and building it with the standard tailplane or the experimental butterfly tail (similar to a Beech Bonanza.) The wing is seperated in a way that would make producing the planned rearward or foreward swept wing a bit easier.
I had mentioned DML's "tricky fit" in an earlier iteration of this page, before I'd gotten into the kit. This is a bit of an understatement - the kit is well detailed, yes, and provides photoetched metal as well as plastic parts. I added to this with an Eduard detail set.The Eduard parts went together well, though they looked odd to me at times... let's get into detail.
Construction starts with your first choice - to show the aircraft with the dorsal engine pod open (displaying the well detailed engine) or shut. If you display it open, you construct the engine at this time, with the intake and exhaust pieces. If you choose to keep it closed (as I did,) you have two simple assemblies (front intake and the exhaust channel) to build. I wish Dragon would have added extra pieces here, so you could display the engine alongside the aircraft. You can get away with using the front piece on the engine, and blanking off the intake (a simple flat piece of wood was used for this on the real aircraft) but the rear assembly would take quite a bit of scratch building. Remember to prepaint these areas!
The next area that gets worked on is the instrument panel. Dragon supplies a decent, photoetched panel, but I went with the Eduard panel I'd purchased. Eduard makes a similar panel, but with film instruments behind them. A little prepainting, and attaching the instrument faces, and it was ready to go. The panel also has the gunsight and rudder pedal assembly - I was not thrilled with this setup. This is the first place you *have* to use DML's photoetch - it's apparently not brass (like Eduard's, which is easy to detach) but steel, which is exceptionally hard to cut and very hard on your tools. There is no positive location for anything here - the pedals apparently just "hang off" the end of the instrument "cowl." This is a very weak (and annoying) part later. The seat "bucket" and ejection handles are replaced with an Eduard etched metal piece, which looks big "out of the box" but fits well when put into the cockpit. The Eduard set also has you drill holes in the seat back for the shoulder restraints - don't forget to do this if you use the set (pilot restraints are not included in the regular DML kit.)
You'll notice by this time that there's no cockpit "tub" to build. Everything fits right into the left and right cockpit halves - in fact, the middle of the cockpit is taken up with the nosewheel well! (It also shows a degree of ingenuity in the design - instead of trying to fit in a gear up/down indicator, the designers just cut a hole in the nosewheel well and put in a window. This is shown in the kit as well.)
After putting the seat, center console, and instrument panel/rudders together, it's time to start fitting the bits into the fuselage. If you use the Eduard set, replacement sidewalls and details are given - I fit them in after grinding off the kit detail, but don't see a big improvement there. Eduard also has you clean off the sidewall with the engine controls, and fit the photoetched top and levers in. Be careful with the levers. Chances are, you will lose them. If so, replace with fine sprue or pins. Don't forget the cannon fairings on the inside - these are handed (there is a definate left and right side piece.) The instructions have you fit the nosewheel in at this point. I tried to do my usual method and left it off until it was almost time to paint - don't do this. Put it in now and make sure you have a *secure* fit. The nosewheel leg aligns itself.
The next step has three sub-steps, and is the most annoying, frustrating part of this kit - the main landing gear bays. The basic "floor" (ceiling?) and ends of the bay go together well. The landing gear needed some trimming to fit the etched parts (and if you use the Eduard parts for the torque links, you have some gaps to fill that are normally taken care of by the kit parts.) Test fitting here revealed that I'd need to trip the "stubs" on the outside of the landing gear legs to get them to fit into the fuselage! After seveeral attempts, they fit. I then tried to get part E9 (retraction gear, it looks like) to fit as shown. it doesn't, or at least didn't for me. I got it "close" but it was a bit more fiddly than it needed to be. There's no definate placement in the parts. The next step (6) is worse, though. Part MA-3 needs to be trimmed if you put it where they show it, and the two links (MA6 and 7) just would not fit. Let MA3 dry thoroughly and make sure it's secure, or when you thread part C25 (some sort of support) through, it will break free. You don't want this. It's impressively busy when it's finished, but it's a pain.
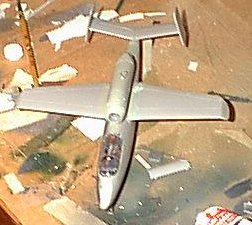
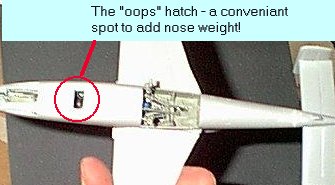 Next, the wings get fitted together, and the fuselage and landing gear get mated. Don't forget to put noseweight in! It's easier to do at this point, but if you forget (like I did) there's a "hatch" in the bottom, just behind the cockpit, that you can fit numerous small fishing lead weights in to get it to sit on its nose. The wings are another point most people complain about on this kit - on mine, one wing fit fine, the other left large (1/16") gaps that needed to be filled. You can also elect to use the V-tail (used on HE-162v6) instead of the operational, twin tail. (If you scratchbuild the swept-back or -foreward wings, the V tail is the tail to use as well.)
Id' suggest waiting to put the engine in if you're doing the open engine pod, to facilitate painting and filling any gaps in the wings. (I'd suggest doing this with either version, actually.) The instructions for the closed engine pod arent' very clear - set the edges of the engine pod so that they're sitting in the "ridge" formed by the edge of the engine tray and the raised section on it. Use this to align the engine parts, and the front and rear faces of the engine.It attaches nicely, but you'll have some work to properly align everything.The "flat" spots on the front and rear of the engine pod go towards the aircraft.
Attaching the landing gear doors - Unless you want to do an "in-flight" -162 (in which case you can skip the whole landing gear bay problem,) you need to seperate the gear doors from the center section. It was while putting this center section in that I found out the metal piece (MA3) I"d talked about earlier was too tall, and managed to break it off and have it tangle itself in the supports. To get this section to sit properly, you need to have patience, and superglue. This is also your last chance to add noseweight (if you forgot it) in the "Hatch" behind the cockpit, as the shell ejector chute bit fills this hole.
In the home stretch, the last fiddly bit ou have to add is the instrument panel and rudder pedals. These broke off twice while I was attempting to fit them in - the joint between the panel and pedals is horrible. Finally, I just let them break off, fit the pedals in, and with the aid of tweezers pulled the pedals back up and superglued them to the panel.
 Don't add the wheels yet, but go ahead and add the cockpit, nose air data probe, and don't forget the cannon barrels. I hollowed mine out with an X-Acto knife, and inserted them after painting.The canopy (thankfully) fit well in the closed position, and was secured that way. The parts are a little blurry, but not enough to badly distort detail.
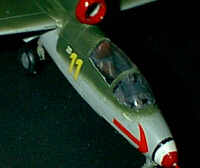
Painting. The color schemes on these can be either very easy or rather difficult, depending on the aircraft you do. These were mostly assembled as subassemblies by numerous factories, who then shipped the parts to a final assembly point. Shades of green, blue, and primer could vary easily between the parts, and lead to a very "patchwork" effect. You can see this in two of the three examples Dragon supplies. Unfortunately, somebody got confused when printing the instructions and reversed some colors in the top and bottom views. I did the simplest scheme, Emil Demuth's aircraft of 3/JG1, and the topside colors are reversed in the instructions. Anywhere ou see light blue (which should actually *be* light blue) substitute a dark green. This aircraft had a topside solid color camoflage of dark green, with light blue just touching the edges of the leading edge and tip plates. To try to make sense of the other schemes:
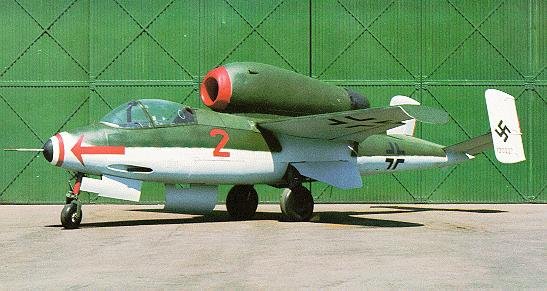
JG1 Flown By Oberst Herbert Ihlefeld, werknummer 120230: Gear doors and center section of horizontal tail are in RLM66 Dark Grey. Left wing, topside, and left tail (horizontal) are in dark green. Right wing, engine pod, and right horizontal tail are in Olive Drab. Everything else is in light blue. As a side note, this is now displayed in the Smithsonian with a replacement tail, showing werknummer 120222. After restoration, it has a darker color engine intake (another dark green?) whereas before it was lighter (but does not appear to be the red of the arrow on the front fuselage, which is darker.) See the Schiffer book, HE-162 "Volksjager"
1/JG1 flown by Houptmann Helmut Kunnecke, werknummer 120054,similar to 120230 above, without the RLM66 Dark Grey sections. Engine front appears to be natural metal ("Gun Chrome") according to instructions, but there is a possibility of it being dark green. I couldn't find any pictures of this aircraft.
The aircraft I modelled had a red and white nose with a black band at the rear. Instead of dealing with the decal for this band, I simply painted the nose white, allowed it to dry, then painted the red section and the black band at the rear by hand.
DecalsDragon makes excellent decals. THey're thin, but don't tear, and settle down nicely with a little mild setting solution such as AeroSol II.This aircraft, unlike the Heinkel 280 I finished just before it, has a wealth of stencils. Apply the main markings first, then the stencils. Once everything's dry, don't forget to add the cannon barrels or light *will* come in from the cockpit.
This kit is definately not for the beginner, with its tricky fit and photoetch. The detail is nice, but there is a lot of work involved. Still, I'd like to build another (actually several) to deal with some of the experimental versions involved. Preferrably through an original Trimaster kit, to see if the fit is any better (it is reported to be.) If you want an unusual aircraft and don't mind the amount of work that goes into this kit, you'll be happy with the result. If you're expecting a kit that falls together like a Tamiya, Hasegawa, or even later Eduard or ICM kit, you'll be disappointed. Reccommended only to experienced builders.
Reference materials (available from Amazon.com)
Heinkel He 162 'Volksjager'
 Heinkel He 162 (X Planes of the Third Reich.