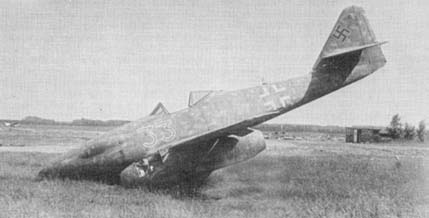
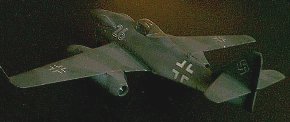
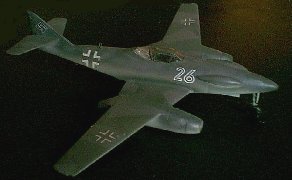
A pair of captured ME-262 recon aircraft
| Kit | Kit Manufacturer | Scale | Price | Options | Out of Box (OOB) or Modified | Rating (1-10 10=best) |
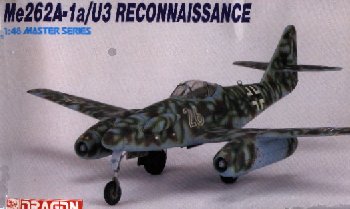
| Messerschmidt ME-262 A-1a/U2 | Dragon/DML | 1/48 | $28 | Markings | OOB | 7 |
 A bit of advice, before going into the kit too far. If you ask about
a kit, and the comment you get the most is "Good luck," start worrying.
This kit takes a great deal of model building's two "P's" - Patience, and
Putty. This is definately not a kit for beginners!
A bit of advice, before going into the kit too far. If you ask about
a kit, and the comment you get the most is "Good luck," start worrying.
This kit takes a great deal of model building's two "P's" - Patience, and
Putty. This is definately not a kit for beginners!
The prototype this was modelled on was an unarmed reconnaissance variant of Germany's famed Messerschmidt ME-262. The quartet of 20mm cannon in the nose were replaced with cameras, allowing this to be a fast recon aircraft.
One of the first things you'll notice about the kit is the box. Instead of the wonderful artwork so many manufacturers put on their box tops, this has a picture of... the kit. Which isn't so bad, except for the paint scheme they've chosen for the model. It may be "realistic" for some aircraft, considering the conditions in Germany in late WWII, but RLM-76 ("Lichtblau") with brown splotches and green freehand squiggles looks... horrendous. It looks closer to vandalism than camoflage.
 The kit mouldings are quite nice - save for an occasional bit of
flash. The panel lines are there, finely engraved - there to be weathered
if you want, but not standing out like a sore thumb. The canopy glass is
quite clear, and the plastic is slightly on the "hard" side. The kit instructions
are missing what I find one of their more enjoyable aspects - namely, any
history of the aircraft type. They are instructions, nothing more.
You will also find a set of vinyl tires.
The kit mouldings are quite nice - save for an occasional bit of
flash. The panel lines are there, finely engraved - there to be weathered
if you want, but not standing out like a sore thumb. The canopy glass is
quite clear, and the plastic is slightly on the "hard" side. The kit instructions
are missing what I find one of their more enjoyable aspects - namely, any
history of the aircraft type. They are instructions, nothing more.
You will also find a set of vinyl tires.
If you look closely, you'll notice the way DML chose to create the kit - they took their ME-262 A1 kit - a "pure" fighter/interceptor variant, and added two specialized sprues. One holds small detail pieces, and one holds the nose bulges and the plugs for the cannon ports (more on this later.)
The cockpit went together without a hitch. Everything fit well save for one side console top, which needed some shaving down to fit correctly. There were no real suprises here.
Then things got... interesting.
Don't bother painting the gun bay in step 3. I can only assume they have you do this for reasons of nose weight. (It isn't enough, by the way, but they never mention adding more. ADD MORE!) You build up the complete four-cannon nose bay, only to hide it forever under un-opened recon nose hatches. A set of cameras or something would have been appreciated more. If you don't want to build up the gun bay, attach bulkhead H18 to platform/nose wheel bay H11, and add modelling clay after step 4. Don't forget the shell ejection chute plugs in step 4.
 The nose took a good ten minutes
of working with. As *soon* as it was
lined up properly, I superglued it in place. The same finicky fit was dealt with through the entire fuselage.
It was taped together and put where it wouldn't even be breathed on funny
once alignment was finished. The fuselage still required a good deal of
scraping and puttying to get rid of seams.
The nose took a good ten minutes
of working with. As *soon* as it was
lined up properly, I superglued it in place. The same finicky fit was dealt with through the entire fuselage.
It was taped together and put where it wouldn't even be breathed on funny
once alignment was finished. The fuselage still required a good deal of
scraping and puttying to get rid of seams.
Following this, you put the nose hatches on, and stick the plastic plugs in the cannon ports. If you choose to replace the guns with clay and/or lead weight (since they won't be seen,) fit it now. The plastic plugs take some fiddling around with to get in and fit flush. Take your time - or use putty.
The nose gear went together fine. Check your sources to see if your aircraft used the front "torsion" arm on the oleo. You may want to leave the vinyl wheels off until after painting.
Steps 7 through 10 are very frustrating - you assemble the rest of the main landing gear bay, which went together all right. The main gear bay of the real ME-262 was open, and to be fair, this is represented decently.Everything pretty well helps line everything else up - though, again, you may want to keep the superglue handy.
Mating the wing to the fuselage was frustrating - it finally came close to the wing roots moulded into the fuse. sides, but lining it up underneath, and on the sides, and in front, is an exercise in frustration. A good bit of putty was still needed to take care of gaps, dips, and such. I spent a good hour lining things up, tacking them down with superglue, gluing, checking alignment, etc.
The next two steps are dealing with the main gear, and seem to go together fine. Enjoy it.
 After this, you get into the canopy (which seemed slightly off-size)
- the rear bulkhead (b22) needed to be shaved down slightly, as well as
the area it was to be mounted in, in order to fit properly. Fit, fit, test
fit, and fit again. You have the choice of having the armored headrest
in the main cockpit, and having the canopy open or closed. I closed mine. (I prefer the "cleaner" lines of the 262 with it closed.)
After this, you get into the canopy (which seemed slightly off-size)
- the rear bulkhead (b22) needed to be shaved down slightly, as well as
the area it was to be mounted in, in order to fit properly. Fit, fit, test
fit, and fit again. You have the choice of having the armored headrest
in the main cockpit, and having the canopy open or closed. I closed mine. (I prefer the "cleaner" lines of the 262 with it closed.)
Finally, you're at the end - Step 15 - which sums up the rest of this kit. Frustrating, but well detailed. You create the two jet engine nacelles in this step - one of which went together decently, one of which had gaps and fit poorly. Watch your part numbers! Some are specific to the left or right side, and you don't want to get them confused. (OK, most of them are side-specific.) Once they're together, you have a lot of test fitting, gluing, then puttying, to attach them to the undersides of the wings. Trim, fit, trim some more. I did get a tip I'll be using in later DML 262 kits here - ignore the instructions, and glue the nacelle sides to the wing. Line them up, then work on the nacelle front and back. We'll see how that works out.
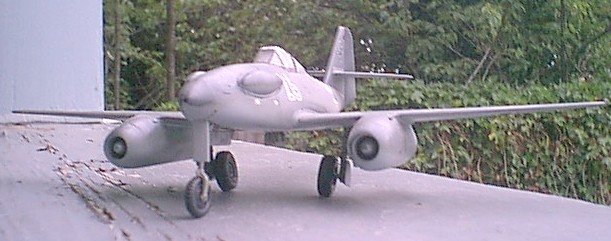
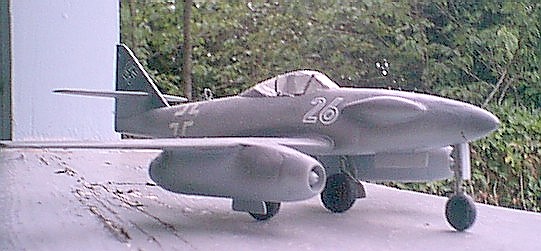
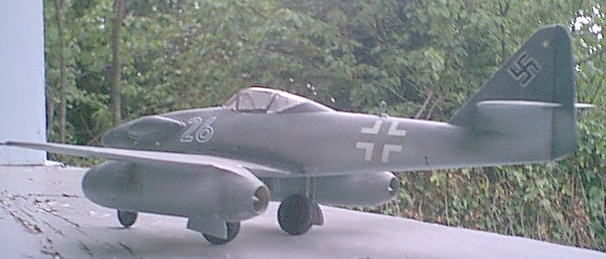
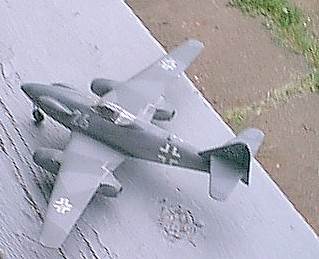 I painted the aircraft in an alternate scheme (I don't know how "correct"
it is, but it looks better to me than the vandalism shown on the box) consisting
of a splinter pattern of dunkelgrun and braunviolett, with lichtblau undersurfaces.
I may still add a light pattern of disruptive "squiggles" or mottling.
I painted the aircraft in an alternate scheme (I don't know how "correct"
it is, but it looks better to me than the vandalism shown on the box) consisting
of a splinter pattern of dunkelgrun and braunviolett, with lichtblau undersurfaces.
I may still add a light pattern of disruptive "squiggles" or mottling.
Revisiting the commentary - This was one of the first DML kits I'd put together. With some experience, this kit is not all that bad to work on. It's not a "shake and bake" Tamiya kit, by any means, but someone with a few kits under their belt should have no problems with it at all. The review's been toned down slightly from it's initial harsh commentary to reflect this.