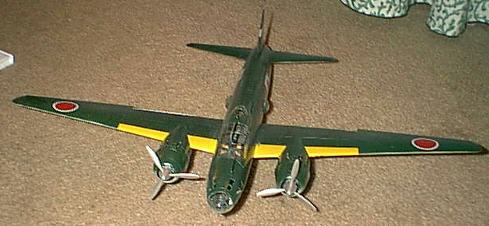
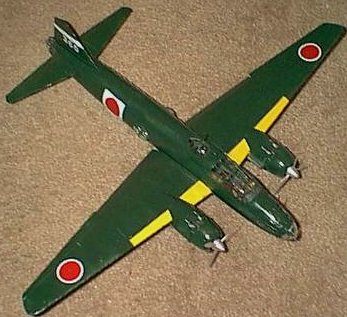
Mitsubishi G4M1 "Betty" Type 11

Kit |
Kit Manufacturer |
Scale |
Price |
Options |
Out of Box (OOB) or Modified |
Rating (1-10 10=best) |
Mitsubishi Isshikirikko G4M1 Type 11 |
Tamiya |
1:48 |
$45 |
Armament, Markings |
None |
The Mitsubishi Betty was one of the most important Japanese aircraft in World War II. Designed for the Japanese Navy in their belief (inherited from the Royal Navy) that long ranged land based aircraft could be developed to support the Naval forces. The Japanese navy took this to heart, and took the idea of range to an extreme in their aircraft designs. The infamous A6M Zero was one example, where armor and other protection was eliminated for the sake of range and maneuverability - giving such extreme range that land based zeros were assumed to be from (nonexistant) aircraft carriers in the area. The G4M (codenamed "Betty" by the allies) also took the ideas of extreme range into its design. While it created a versatile aircraft, useful for transport, bombing, torpedo bombing, and reconnaissance, it also incorporated a large, unarmored "wet wing" which - when its explosive properties were discovered by Allied fighter pilots - led to the nickname "the one shot lighter." Nontheless, the Betty saw extensive action throughout World War II, from attacks in China, to the sinking of the Prince of Wales, to ferrying the surrender party at the end of the war.
The kit itself is quite extensive - and rather large. The long wings and thick, cigar shaped fuselage will require a deep shelf for display. It does, however, show off typical Tamiya engineering foresight throughout the kit. All the parts fit together well, and - in a trend they've continued using in kits such as their Mosquito - they've incorporated a sort of wing "spar" which fits through the fuselage and supports the (weighty) wings.
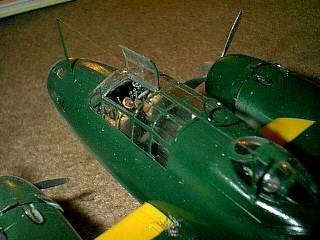
The most frustrating thing about this kit has nothing to do with Tamiya, but the design of the original bomber. Masking all the windows is a real pain. Expect to spend several hours working on the various curved surfaces, trying to get all the windows covered. An alternative I'd found on the worst of the surfaces (namely, the "dome" window on the tip of the nose glazing) - white glue. Just coat the clear areas with it, let it dry, and when you're done painting pop it off. Works wonderfully.
The kit provides you with several marking options - some aircraft in a green/brown disruptive camoflage and some in standard IJN green over grey. They also supplied a seperate sheet of revised yellow wing ID leading edge markings, because the shade was wrong on the original sheet. Also, decide which version you want and watch the options for it - some have spinners installed on the props, while others leave the hub bare.
The kit also provides several armament options - which you will be stuck with depending on what you want! The original Betty didn't have bomb bay doors, but instead had various bomb bay covers. For regular bombing missions, the cover was left off. For reconnaissance or transport, it was put on, and for torpedo missions, a cover with a cutout for the "long lance" torpedo was fitted. Tamiya only gives you one cover, with a cutout guide moulded in the back for the torpedo version. Decide ahead of time what you want to build (though you could put off adding the cover, a seperate piece, until the end.)
This kit, for me, almost started to get put together by accident. I'd started prepainting while trying to decide what to build next - which led to test fitting, which led to gluing. The wings and fuselage, despite being so long, were not warped and fit together quite well. The long interior parts, painted RLM 66 Dark Grey (with some Metallic Blue Green on some surfaces) fit perfectly. Test fitting so far showed no seams between the fuselage halves or the fuselage and wings - which could be left off for ease of painting. I didn't do this (no idea why,) but no gaps are visible (or extant) at the wing join.
The model pretty much does fall together. The only odd parts are the engine nacelles - be careful with your gluing and fitting (which I wasn't on one nacelle) and they should go together well. Also - attach the nosecone to the front of the fuselage with white glue. Just tack it on. Why? The windows around the sides of the nose are attached from the inside. When un-masking my Betty after painting, I managed to not only lose the nose machine gun (which slid inside the fuselage) but one set of two windows popped in as well. This was good, as I managed to cut a notch in a bit of sprue and move the nose machine gun back into position - but I have no idea where the windows have got to inside the fuselage, nor how I'll get them back into place.
The decals went on pretty well. The white is, unfortunately, translucent - but this wasn't a big suprise, especially considering how dark the underlying green is. If you do the aircraft I did (360) be sure the large white decal under the fuselage hinomarus is positioned fairly close to where it'll finally end up - they're a pain to move. The wing ID stripes went down pretty well - cut around the raised detail on the wing and it'll settle down nicely. Tamiya decals, however, do not seem to like Microsol very much. They are, however, thin enough to snuggle down into the detail on their own decently.
I got a little more adventurous with the weathering - Rub 'n buff left over from "metalizing" the torpedo, lightly applied with a ratty brush, works well for chipped leading edge paint and slightly "worn" areas. It doesn't look factory fresh, nor does the plane look as "ratted out" as some models do (though to be fair, it's authentic for Japanese aircraft. They were used heavily, and camoflage was often field applied without primer.) Last but not least - "invisible" nylon thread, added to the radio aerials to simulate the radio wire. A quick run over it with a Sharpie marker, and we're set.
The fit was, in general, fine. Masking the transparencies took several 1/2 - 1 hour sessions a day. After that, the kit pretty much fell together (no suprise.) Still, it's a good looking aircraft. It's also a big model - be sure you have plenty of room on a shelf for it.