 .
.
.|
|
|
|
|
|
|
|
|
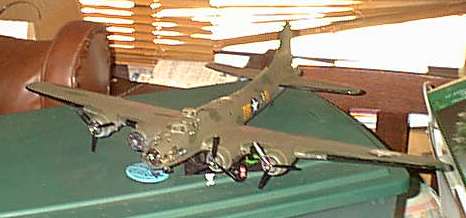
B-17F Flying Fortress "Memphis Belle" |
|
|
|
|
|
|
The B-17 Flying Fortress is the bomber that comes to mind when someone brings up the US's bombing campaign in the second world war. Conceived in the mid '30s, when most manufacturers equated "Multi-engine" with "two," the B-17 was designed to carry a large (for the time) load of bombs deep into enemy territory, able to defend itself against enemy fighters - especially with the "box" formation developed for these tactics. The doctrine of "The bomber will always get through" - which relegated fighters to short-range interception duties instead of long-range escorts - soon proved to be fatally flawed. Still, thousands of these aircraft served in both Europe and the Pacific, though their chances of survival were greatly increased when the long-range escort fighters (such as P-38 Lightnings, P-51 Mustangs, and P-47 Thunderbolts) were sent along.
This kit is the one most often found in Wal-mart stores with paint, glue, and brushes for about $20. The kit itself is several decades old, and it shows. Fit has degraded with age, panel lines are raised, and interior detail is laughable. Still, it can be an impressive kit when it's done, as this is a *large* aircraft. It can be improved with some scratchbuilding and aftermarket photoetch (Eduard makes a set) and possibly resin.
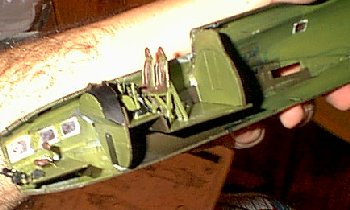 The cockpit and bombardier/navigators station are probably the most visible interior areas. The cockpit is devoid of much detail - an instrument panel, two seats on "stilts," and a rudimentary console are all that make this area up. Once ithe kit is finished, though, not much can be sesen through the small window openings in the thick, brittle clear parts. (My canopy was missing one side due to two moves. I replaced it with thin clear plastic, though during cleanup the upper "skylight" window on the pilot's side was cracked. Ah well.) The bombardier's station is even less detailed - but more visible. The "detail" consists of a bombsight, a console on the left, and the bombardier's seat. A good part of the interior can be seen through the clear nose cone, however, so some aftermarket or scratchbuilt detail is advisable. You can't see all the way to the back, but on the right side (looking "in" from the front) there should be a second seat facing the side, and a table - this is for the navigator. Oxygen bottles and other details are near the windows on the "left" (again, looking in from the front.) Some hint of this detail is suggested, though the clear plastic pieces given for these areas do distort the appearance of the items. Unless these pieces are replaces with (perhaps) a vac-form clear replacement, superdetailing isn't needed. The Eduard photoetch set for this kit can help, however.
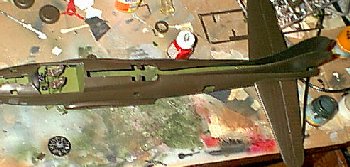 The rest of the interior is basically a big open hole. I'd suggest making a plastic blanking piece for the floor of the radio room (the clear rear area of the decking) or you'll see light right through to the underside's ball turret. In the real aircraft, this room had bulkheads on both sides (the bomb bay on one side, the rear of the aircraft on the other.) Paint it interior green, but again, don't worry overmuch about detailing - the clear parts don't lend themselves to easy viewing of interior detail. Put the ball turret completely together (there's detail missing in here, too) and attach to its "yoke," then attach that to the inside of the aircraft. Trying to attach it after the fact is a pain. You may want to pre-paint the framing and mask the ball off.
Fitting the fuselage halves together is interesting. Fit the bombardier's "floor" in loosely (don't glue it,) then fit the cockpit in on one side. Try to get the cockpit and the ball turret assemblies lined up and secured as you fit the fuselage halves together. Don't forget to add the tailwheel - you may want to try to add this after just getting the front together and glued. Onec everything's together and the glue has set, work on getting the bombardier's floor foreward to its location, and secure it with superglue and/or regular model cement. It's the only way I was able to get everything together.
 Next comes the wings. You're instructed to put the landing gear together first, then attach it to the underside of the wing. Don't skip this - even though I normally attach gear after painting, I'd follow these steps. The "ceiling" of the landing gear bay just doesnt' hold up to attaching the landing gear. Reinforce this joint with bits of sprue glued in on top of the gear bay, so there's something for it to push "up" against. I didn't do this, and in consequence of having to reattach that point 3 times, one of the landing gear legs is skewed slightly to the side. It's noticeable. There's also the front retraction arms that do not fit in well if you try to put it off until later. The landing gear wheels are two-piece affairs. They do, however, assemble without a seam - one of the few areas of this aircraft I can say this in!
The wings go together decently, but need serious thinning on the trailing edge. Tape all along the edges. The engine nacelles warped slightly, and hand to be held in place while the glue dried. It led to some bad seams. These are not fun to clean up - even after a good bit of sanding and putty, some still remain.
The wings attach securely to the fuselage through their L-shaped "clips." Unfortuntaely, it also makes it difficult to work on any gaps that may appear - in the future, I'd attach the bottom wing first to the fuselage, then the top wing, trimming off those "clips" entirely (they butt up against the rear of the cockpit. I doubt I'd trust the remaining joint, however.
The engines are small, single-row radials (which I *believe* are correct for this model B-17.) They're nicely molded, and fit well if you watch the seam on the wings (which goes right through their mount point.) I had one point which insisted on popping open, and led to avery tight fit for the engine. This actually worked to my advantage, though - the engines fit securely, which means you can assemble them and the cowls, then press-fit (but not glue) them to the wing. After painting, just pop them off, put in the shaft for the propeller, attach the propeller and glue them back on. (If you look at the pictures... yes, I did lose a cowling. I got called away and I'm sure it became a cat toy... I'll find it eventually.)
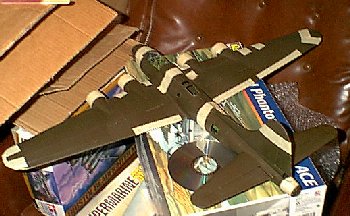
The model is essentially finished at this point, and ready for painting.
You can leave most of the clear pieces (including the top turret) off of the model while painting - the only things that will need masking are the side windows on the nose, the nose itself (if you attach it, which would probably be easier than masking the interior,) two side windows by the radio compartment, and the door window. Leave off all other windows (including the rear gunner's glass enclosure) until after painting, and paint the framework by hand. (There's not much of it.)
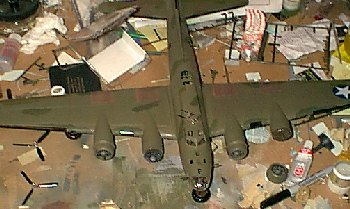
PAINTING. The kit instructions for this kit are way off as far as painting. If you follow them, the entire aircraft will be olive drab, top and bottom. If you go to the sites for the Memphis Belle (listed below) you'll see that's not the case. The aircraft should  be olive drab over neutral grey, with medium green "splotches" applied here and there to break up the outline. (It also helps make it more interesting visually.) You will probably need more than the paint given to you in the box, if you have their "bonus pack," such as you can find at Wal-Mart. As I was running out of paint at this point (really!) I ended up using a small jar of ModelMaster Olive Drab such as you can find (again) at wal-mart in their military aircraft finishing set. The one jar proved to be just enough to cover the top and sides. The neutral grey came from Gunze-Sangyo. Medium green was then applied by hand in the "splotched" areas. The metal prop hubs were finished with Rub'n'buff, and then painted flat black on the blades when the rub'n'buff had dried. I also went over the lower side turbocharger vents with "Burnt exhaust" metalizer (which can indeed be brushed on, despite what the bottle says. It's very delicate paint, however.)
Once the paint had dried, I put on the decals. They settled in well, and at first they seemed OK with the Solvaset I'd used to help them get over the raised detail. Once it had dried, though, it was obvious the Solvaset was much too harsh. Most decals had some sort of wrinkle in them, at least with the larger ones. (Those that had gone on flat surfaces were not "aided." I'm sure a milder decal setting solution such as AeroSol II would have worked out, or else just "fixing" them on with a lint free cloth dampened with warm water. They did fit nicely, however, and there seemed to be no registry problems with them. Once they had dried, I trimmed off or re-dampened and set the decals that had wrinkled and/or silvered with water, or trimmed out the wrinkled areas (in some spaces, like the areas between the tail serial.) It fixed the appearance of the model for the most part, but I would highly suggest not using a solvent as strong as Solvaset with this kit's decals.
 Once all this had dried, I did a little weathering. Grinding pastels of a rust-red, some pale grey, and a darker grey, I went over the upper side exhaust slots (and a little on the upper tail,) as well as the turbo exhausts and engine exhausts. (These really need to be drilled out, but the fit problems were getting a little annoying to me at this point. I'll most likely go back and do those later.) Small "chips" of silver were added to the cowls, leading edges (where the de-icer boots weren't fitted,) and a few panels, and the model was set aside to dry.
All in all, this is a large kit, and reasonably cheap. I believe it's one of Revell's kits, from before the Revell-Monogram merger. The kit shows its age in the raised panel lines, all the flash from a much-used mold, and the general lack of detail or good fit. I don't believe the same criticisms would hold true for the (former "Monogram) B-17G kits (still available,) as they generally show a bit more detail. If you're looking for an impressive finished kit, possibly to hang from a ceiling, this would be it.
Websites to reference:
http://www.memphis-belle.com
http://www.memphisbelle.com