Beaufighter
Contributed by Ray Phillips

|
Kit
|
Kit Manufacturer
|
Scale
|
Price
|
Options
|
Out of Box (OOB) or Modified
|
Rating (1-10 10=best)
|
|
Tamiya Beaufighter NF IV
|
Tamiya
|
1:48
|
$28
|
markings
|
Alternate set of markings
|
10
|
Webmaster's note - Yes, I've broken with my 'I've built and reviewed this kit" policy, but I also asked for this review after providing this kit while doing some "collection trimming." Enjoy the review! - Eric
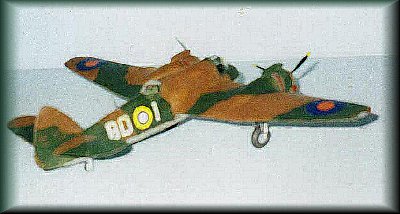
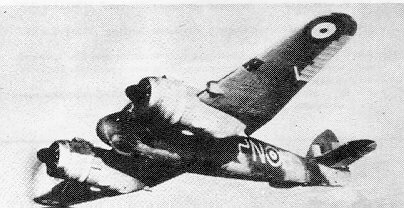
"’BEAU’ AS IN BEAUFIGHTER"
Actually the dictionary defines Beau as among other things "A Dandy." And frankly, Tamiya’s Kit for the Beaufighter is really just that A Dandy.
I bought this kit from your Webmaster, Eric McCann, after I had written to him requesting the cost of both the Beaufighter and Lancaster kits. Upon opening the kit I was struck by the nicely- finished moldings and the clean-looking sprues. I had not built a scale model since I last carved one out of wood in Birmingham, England, during the height of the Blitz. Only that time it was a Spitfire. All the rage among schoolboys at that time for obvious reasons.
To get back to the kit, I went out and bought several types of glue, CA, Testor’s slow-setting type and finally Superglue. I’m a bit chary of using the latter because I always end up with lots of fingers stuck together ! Then I studied the instructions. They seemed straightforward, only I didn’t realize some of the symbols were for paint color and for non-painted surfaces. I then went out and bought a whole slew of Testor’s small bottles of enamel. I didn’t know then that it would have been better to have used Acrylic instead of the oil-based paint. That came later after a few messy cleanups.
Everything went quite well on kit assembly. The fuselage halves are a thing of beauty I don’t know how Tamiya gets them to fit so accurately. My blue haze of self-contentment continued until I got to the undercarriage. I noticed that the undercart could be installed in a small subassembly that fitted into the engine nacelles. So I immediately pushed the subassembly modules (without the undercarriage) in place and promptly forgot about the undercarriage till later. I had learned a couple of things off the net and also ordered some Masks for the wheels and canopy. Plus some Aeromaster decals. The Black Magic people had to be telephoned three times for non-delivery over four weeks, although I had previously paid them and kept quoting the shipping order number to them. They kept losing it. Finally, the masks arrived. By this time I had got up to glueing the canopy on. After suitable soaking and drying the clear part in Future (Gee those web tips are great aren’t they?) I glued it into the fuselage. I didn’t notice at the time that it was what in Britain we used to call "skew-whiff" – meaning it was slightly misaligned on one side. It wasn’t till I really had a closer look later that I realized there was a small gap under the left side of the canopy where it fitted the fuselage side. I felt like kicking myself. I hurriedly applied some putty and tried to hide the error. Sorry, it was still somewhat visible. Under similar circumstances my Dad used to say "if you hadn’t mentioned it I wouldn’t have noticed," that was true because several fellow hobbyists didn’t really see it until I stupidly pointed it out. (Motto: keep my mouth shut in future.)
I bought an Aztek airbrush on sale via the good offices of Mark Hoffman (see him often on Hyperscale). The airbrush seemed to work ok for the first couple of times when applying acrylic flat gray paint. I had also bought some Black Magic camouflage masks.
I did run into a small fit problem with the wings. The two wing roots didn’t seem equal in height above the wing attachments where they joined the fuselage. Try as I might I couldn’t get them both to look the same at the roots. I thought well they really can’t look at both sides of the fuselage at the same time can they? (Refer to mouth-shutting advice quoted above.)
By the time I got around to installing the masks for the brown painting part of the green and brown camouflage pattern, my wife and I found they worked fine on the wings, but didn’t seem to fit worth a darn on the fuselage sides. Next time I’ll save my money and just mask-off with tape or cutout "post-its." Lucy then brought her fine talents to bear on masking and painting the canopy. She did a beautiful job and I silently said to myself "you know who can do the fiddley stuff from now on don’t you ?"
By this time I was ready to install the undercarriage. When I got out the numbered parts I couldn’t believe my eyes. All those darned small pieces just to make up the criss-cross structure of the landing struts. In fact, I couldn’t get any of them to hold still long enough to glue them in to position. I eventually got them stuck, but they didn’t look quite right. Sure enough when trying to insert them as a dry fit into the subassembled receptacles in the nacelle undersides they proved to be far too wide. I went to bed in a huff trying to figure out how I was going to get them in. The next day I thought the heck with it and got out the trusty Dremel with suitable sanding disk and went to work. When the strut sides were finally paper-thin they fitted into the slots. I thought well it’s now hidden and sure enough if I didn’t mention this problem I felt I could get away with it. After all, who really picks up the planes and carefully looks at the underside of the nacelles without the owner’s permission? No permission would ever be forthcoming so . . . end of problem.
I then installed the fancy decals and they went on as advertised with Microsolve (or is it Microset?) and they looked great. My wife did a great job of hand-painting the tires in ‘dirty rubber’ black. I don’t know how she kept the black paint off her previously-painted gray wheel hubs, but she did ! We finally finished up spraying Future on and then Dullcote. I only made one mistake. I mixed the Dullcote with alcohol without realizing it had to be thinned with lacquer thinner. I really clogged up my airbrush and it also didn’t spray worth diddly. I won’t be doing that again.
Proudly, I put the plane on top of one of my tall, black wood stereo speakers and felt quite chuffed that Lucy and I had finished our first model so well. At least the neighbors, relatives and close friends said it was great. I wonder if they were just being kind . . . ?
Next project is a Hawker Fury - I think; Eric says he has a spare kit. The last time I saw one of those was on a cigarette card before WWII. I won’t tell you about my more recent terrible trials and troubles putting together a 1/32nd scale "Matchbox" Tiger Moth. No! it isn’t finished (it now resides in a half-finished condition in the shed in a box in the corner). Please don’t mention either spiders-web thin cabane or wing struts to me for at least six months.! Also, I don’t think my skills are quite up to building the "Monster" otherwise known as the Lancaster just yet.
Hope I haven’t bored you. Oh, by the way, go out and buy that Tamiya Beaufighter kit - I think it’s a "beauty" and after all if I could put it together so can you.
Raymond Phillips
Eric's note - Review content exactly as sent, save for breaking up one paragraph...I've got to talk to him about writing more, don't you think? Pictures will be forthcoming...