Kit |
Kit Manufacturer |
Scale |
Price |
Options |
Out of Box (OOB) or Modified |
Rating (1-10 10=best) |
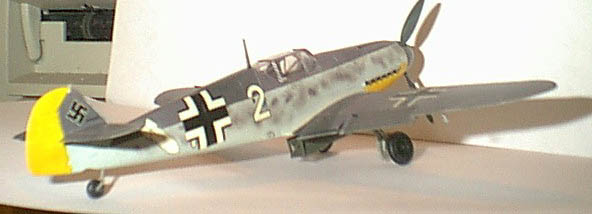
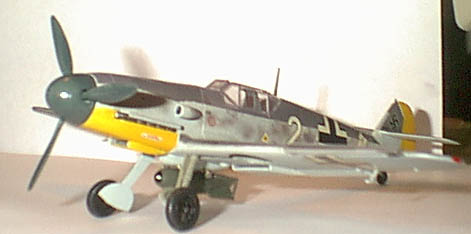
| Messerschmidt BF-109F-4/R1 "10|Jabo/JG2" | Hasegawa | 1/48 |
$23 |
Markings |
oob | 10 |
The BF-109 is probaby the fighter that symbolizes the Luftwaffe in WWII for most people. It saw production throughout the second world war (and in some countries, even afterward) through a long list of variants and subvariants.
The BF-109F was the first major revision to the fighter's line. It featured a new spinner and cowling to smooth out its aerodynamics. It was also initially given a shorter wing, but due to handling problems, it was given rounded wingtips to restore its maneuverability. The spinner-mounted cannon, deleted in most of the "E" series, was restored, and the two 20mm cannon in the wings were deleted.
The F-model ("Friedrich,") like most 109 variants, had several sub variants. Versions were made for ground attack, for reconnaissance, and were even used to try to create a "Zwillung" (twinned) bomber destroyer - consisting of two BF-109s grafted together, much like the later American F-82 Twin Mustang. The version in this kit is of the "Jabo" (Jagdbomber - fighter bomber) R-1 variant.
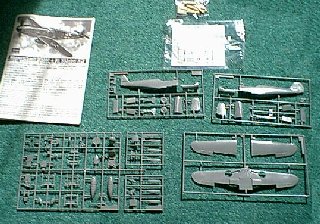 The kit is broken down into the (reasonably standard) Hasegawa 109 part sprues - wing, fuselage, seperate slats, and a lot of cockpit bits. You'll see a total of five plastic sprues - four airframe and wing, one clear. Included for this edition, though, is a resin set which comprises the underfuselage bomb rack (5 pieces) and bomb (7 pieces.) All parts are moulded well, and this is one of the times you see Hasegawa's "universal" wing for later 109 marques - some variants require a panel line be scribed on it, or the wheel wells cut to their squared off shape. It allows Hasegawa to get the most out of their molds, and doesn't really entail any difficult work from the modeller.
Kit Build
I've had a lot of luck with Hasegawa's ME-109 series. They're wonderfully engineered kits that cover the entire line from the E-3 to the K (for the most part,) using a large number of common parts with little modification needed (such as scribing a wing panel on later G-variants, or filling in panels on the F.) There can be a little oddness to the fit on occasion, but for the most part, this is a wonderful series of models, that can usually be built in "spare time" in a week, or over a weekend. As soon as someone learns not to glue their fingers together, they can build this line of kits. (Earlier and later versions, such as the B/C, S-199, or spanish Buchon, are handled by Hobbycraft.)
Construction, as usual, starts with the cockpit. This is standard Hasegawa fare - decent raised detail (given that you wont' see most of it due to the 109's tiny cockpit, it's more than sufficient except for seatbelts) and good fit. It was prepainted RLM-66 Dark Grey, with detail painting as needed. The instrument panel faces and raised detail were brought out with silver artist's pencil, with various knobs and switches (and instrument surrounds) painted red or yellow.
This model was originally going to the Aircraft Resource Center as a contest entry, so it has to be built out of the box. Fortunately, they allow masking-tape seatbelts, so after painting some masking tape, I cut them to length, painted in some silver buckles, and added them to the seat (it needs them.) After the photos for the contest, I'll add a lead from wire or thread for the cannon housing in the cockpit. This is probably the weak point in the cockpit - instead of details for the cannon, they're two boxes. Ah well... if you want to use resin for this, it can't hurt. Also, be sure to install the joystick before fitting the cannon breech. It's a tight fit either way.
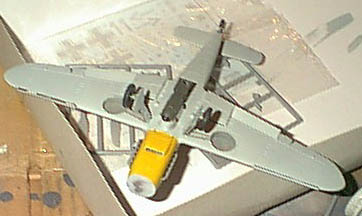 I next went to the wings. They fit together with no problems - these are the same set of wings used in all late model (F-K) ME-109 kits. The only modification you do to them in this kit is to clear the centerline mounting holes. The instructions would have you clear out both - you actually only need one (the one on the left) to mount the centerline bomb rack. I did so, then filled the unneeded one from the inside after fitting the rack. The resin bomb rack is beautifully molded, and had no cleanup needed. It fit quite well into the kit. I didn't fit the bomb sway braces, or bomb, electing to wait until after painting. (The bomb, by the way, fits niecly as well, but some cleanup is needed around the base of the fins.)
After this comes the first major bit of assembly. Fit the instrument panel into place just under the coaming. Fit in the cockpit - the bulkhead in front completes the space in the cowl bulkhead (You'll see what I mean.) Let that set (the seat should NOT be under the rear fairing, for obvious reasons!) then fit the wing. If you work carefully along the wing, it will match up beautifully. I ended up with a slight ridge, actually, from adjusting the OTHER wing without watching one. A light bit of sanding took care of that. Also, the rear mount for the propeller spinner is put in at this point - but there's nothing to hold it, if you want the prop to turn. Either tape it, or glue it, or it will fall out. Oh, and don't forget to trim off the bumps on the left side under the cockpit, and fill the two access panels shown in the instructions. (They're very lightly scribed, you may actually be able to sand them off.)
Let everything dry, and make sure everything's lined up. The next bit gets odd. Hasegawa molded a two piece cowl for this kit because of some of the subtle curves involved. First, glue the gun barrels to the back of the bulkhead. Fit the LEFT cowl first - you'll have to move it around some to get it over the barrel. Line everything up, and let it dry. After this, fit the right. You may actually want to leave the edge of the nose un-glued on top when putting the fuselage together. Don't move, touch, or breathe at this assembly until the glue sets, or you'll end up with cowl lines everywhere. I still needed a touch of putty here and there for this. Once it all dried, I puttied, sanded, and added the supercharger intake (an easy step.)
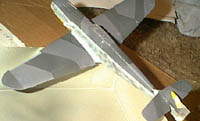 Around this time, the major assemblies were put together - the tail and wings were put together, primered, and the yellow painted. I was trying to get the kit somewhat completed, but it got boxed up for about a year while I was preparing for several moves. I finally went through my stash and decided to finish this kit up. The canopy was painted previously, and taped over. Masking tape - just plain old masking tape - stayed on the canopy for months, and had no problem coming off when I was finished. I masked over the (previously painted) yellow nose and tail, and sprayed some Model Master RLM 76 overall. This dried overnight, and I masked the wings and top of the fuselage for the RLM 74/75. The pattern was painted, the masking removed, and the model allowed to dry.
You'll notice I didn't mention anything about the landing gear or the bomb. I put these on after painting, so they wouldn't be knocked off. The bomb shackles were attached 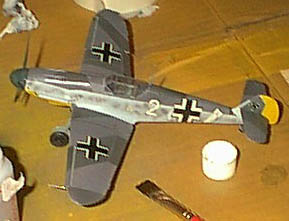 with white glue for some working time. The bomb shackles should (frankly) go on before the landing gear so you have some room to work - I didn't do this, and ended up bumping the gear time after time. (Yes, I still need to find my tweezers.) Once they're set, put the bomb on and adjust the shackles. The landing gear went on easily and securely, as well. I had prepainted the landing gear and oleos months before, and added silver highlights to the oleos. I also added the exhaust stacks and their covers at this time. (Masking and painting is much easier this way.)
Once everything had dried, I hauled out the trusty Aztek 470 airbrush again, and did the side mottling pattern. I was a bit rusty, but I'm rather happy with how it turned out...
There are two options given for this aircraft - the one on the box art was the one I wanted to do (enough luftwaffe geometric codes, give me a bomb on the tail!) The other option has some interesting tail "scoreboard" markings, apparently having sunk several ships.
 The acrylics gave a nice semigloss finish, so a clear glosscoat was not needed. I put on the first few detail stencils - anything (such as filler markings) that would get covered up by major markings. The decals reacted decently with AeroSol II (MicroSol related.) They settled down, and I put on the major markings (walkways, national markings, the bomb and aircraft number.) These were allowed to sit overnight, but took several applications of AeroSol II to settle into the panel lines.
After these sat overnight, the fun of all the small stencils that make up any warplane were added. This took some time, and several markings were knocked off or moved, and had to be replaced. After several attempts at replacing some of the small stencils, I let them dry and added a semigloss acrylic clear topcoat tos eal them.
I haven't weathered the model yet - I rather like how it looks "clean" at the moment, but will probably add a bit of exhaust staining later with ground pastels.
Conclusions
It's a Hasegawa 109, what can you say - it goes together easily, even with the resin parts. If you haven't dealt with them, this sort of kit is easy to use as an introduction. You don't have to worry about the rest of the kit, and can learn a bit about working with resin in the process.