
|
|
|
|
|
|
|
|
|
N1K1 "Rex" floatplane |
|
|
|
|
|
|
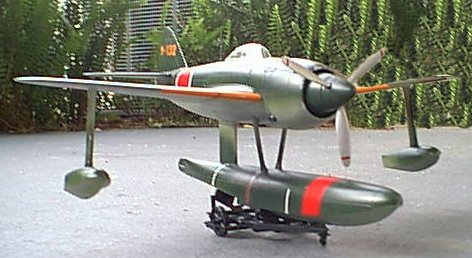
The N1K1 "Rex" was developed in response to a Japanese navy request for a floatplane fighter. It was anticipated that as the Japanese military advanced, air cover would be needed in locations that did not possess an airstrip and might not for some time. The Nakajima A6M2-N "Rufe" conversion of Mitsubishi's "Zero" fighter provided an excellent interim solution for this problem while the Rex was being developed. The Rex itself was later developed into a lethal land-based aircraft.
The kit is typical Tamiya. It comes in a nicely moulded set of light grey sprues. No flash was on any of the parts. This kit just reinforces the ease of building that Tamiya is known for to me - it's what I call my "accidental" build (I started test fitting a few parts, and before I knew it, I was halfway done with the model.) Tamiya includes a weight to fit in the main float to keep the model off of its tail. There were no real problems with fit or finish - some filler was needed where the front supporting struts meet the main float, but that's all.
The kit also includes a small seaplane trolley. Not many parts, all locate positively and securely. A quick bit of painting and it's done and ready to hold the completed model.
Options. There aren't a lot of options with this kit. You can use early or late exhausts, or one of three different tail numbers. All the color schemes are the same (IJN Green over Grey.)
Finishing. This is the first kit I went to a greater length to finish. I painted it with Tamiya acrylics first. I then added an overspray of Future floor wax to give it a glossy surface. Once the Future had dried, I added decals. The decals went down easily and formed well around the surface details. Once these had set, I broke out a set of pastels (blacks, greys, some brown) and added exhaust and "gunsmoke" streaks - the exhaust let me get a little creative with how it would "flow" around the main float struts. I also added some slight 'paint chipping' with a brush wiped in Rub'n'Buff around the front of the cowl. Once this was done, I sealed it with another coat of future, and Micro-Mark's Micro Flat. It didn't flatten it as much as I'd like, but it doesn't look like a museum aircraft. I may still flatten it more, but I'll use something else as a flattening agent.
Pulling the masking tape off pulled the canopy off - they don't have much of an attachment point, but they were definately well masked! A few minutes carefully re-gluing them, and they (and the finish) were secure.
All in all, this is an interesting aircraft and a very easily built model. Any level of kit builder should be able to tackle this and come out with an acceptible to outstanding model.