|
|
|
|
|
|
|
|
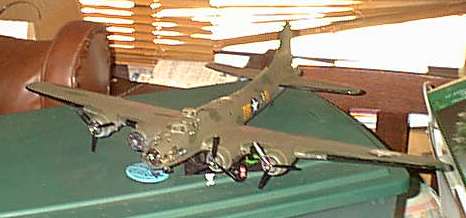
| B-17 "Memphis Belle" |
|
|
|
|
6 |
The "Memphis Belle," one of the first B-17s whose crew survived 25 missions over Germany, is probably one of the most famous individual aircraft in history. Early in World War 2, day bomber crews rarely survived very long due to a lack of fighter escort - which was part of the reason the Royal Air Force switched to night raids. The US Army Air Corps then decided that once a crew survived 25 missions, they would be rotated home. The 'belle and her crew did this, and went on a war bond tour in the US. While not such a mean feat later in the war, with the Luftwaffe essentially defeated and top notch long range escort fighters such as the P-51d available, at this stage in the war it was a big morale boost for both the bomber crews and the folks at home.
 This is not a Pro Modeller kit. This kit, instead, is one of the
"complete" kits that come with paint and glue, sold in WalMart and other
chain stores. As such, it builds into a decent replica from the box for
most people. The kit itself has a few points to look at.
This is not a Pro Modeller kit. This kit, instead, is one of the
"complete" kits that come with paint and glue, sold in WalMart and other
chain stores. As such, it builds into a decent replica from the box for
most people. The kit itself has a few points to look at.
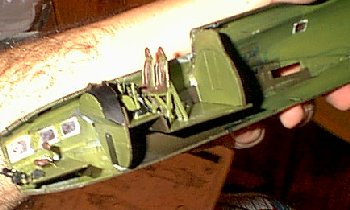
First, there is a very spartan interior. The ProModeller B-17G has a more complete interior, whereas this kit allows you to see through it. A photoetch set, such as the one from Eduard, mixed with some scratch building (which I intend to do) will dress this kit up nicely.
In addition, the color scheme shown is wrong. Monogram would have you paint the kit overall olive drab, top and bottom. The Memphis Belle had olive drab upper surfaces, neutral grey lowers, and splotches of another shade of green seemingly randomly applied. This will be corrected in my building.
Still, from quick fitting and a look around, it seems to be a decent starting point. More as we complete.
Websites to reference:
Not the same site, but good information and photos.
8-2002 - Wow. I thought I'd finished a review on this, the kit's been done for a while!
The kit has a VERY basic interior, as I mentioned above. Fit is... OK, at best. Detail isn't the greatest, but neither are the clear parts. If you want a detailed B-17, go for the Monogram B-17G model, it's much nicer. I dressed up the interior a little with plastic card and Eduard photoetch up front, and blocked off the radio room - you need to, or you will see from the top window through the bottom turret. I also assembled the lower turret - it's not detailed at all, and while the framing gives you some idea of how cramped a space this was, having all the detail inside would give you a better idea. The seam's not bad, but again, the parts aren't all that clear.
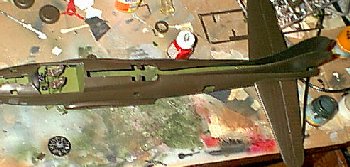 Once everything was worked out inside with either parts or paint, I attached the horizontal tail and glued the fuselage together (hey, I'm going from memory here.) Try to leave the front nose glass off, so you can work the interior windows in. There were a number of gaps to work on, mostly with a mix of tape and superglue. While the fuselage dried, I put the wings together and blocked off the landing gear wells. You REALLY get a sense of how big this kit is at this point. And you REALLY need to blank off those wells, they're very basic. Don't attach the engines, but paint them. I painted them flat black, and highlighted them with silver.
You're actually nearly done at this point - 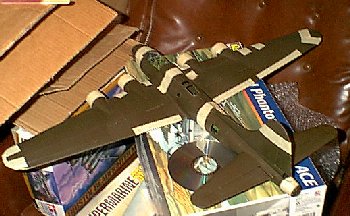 This took a lot of tape to hold everything together, but the wings actually seemed to fit rather well. Overall, it's kind of "soft," though, and filler will be needed in some points.
I didn't add the external bomb racks - some aircraft used them on SHORT missions, but from what I gather, it was rare. Plus, the bombs are rather soft in detail, again. They're sitting in the spares box now, but with the basic, soft shape, I don't think I'll use them as bombs.
Paint and decals
The box instructions are, as mentioned, wrong. They'd have you paint it overal olive drab... wrong. The actual aircraft was typical olive drab over neutral grey, with mediu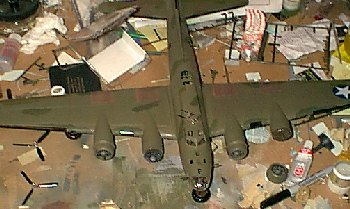 m green disruptive "squiggles" applied along the wing and tail edges. I have to admit I was rather lazy with them, but was working with a brush. (You can see them in photos.) I weathered it with pastels, though I could get some other chipping and such in. Unfortunatley, after all this, one of the cowls disappeared into the great black hole that lives on every modellers' floor - after completely cleaning out the room this was built in to move, the part STILL never showed up. It's not even clear or small! Paint the superchargers and add them at this point, as well. Add the engines, the cowl, and the propellers.
The decals were rather thick, and slightly off register. Better ones exist, but I'm not sure I'd bother unless I were seriously reworking this kit (or a new release comes along.) They reacted "OK" to Solvaset.
My suggestion? If you're looking for a "ceiling hanger," this is a nice show-off kit.If you're looking for a highly detailed replica... you've got some work ahead of you. If you just don't care and want a B-17, well, it's a cheap kit.