
|
|
|
|
|
|
|
|
|
F-117 Stealth Fighter |
|
|
|
|
|
|
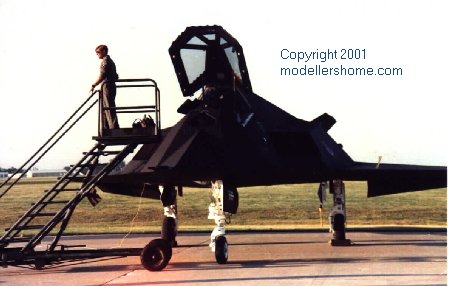
The Gulf War brought to the limelight one of America's better-kept "secrets" - the unusually shaped F-117 Stealth Fighter. Also known as the Nighthawk, the Stealth Fighter is not really a "fighter" at all, but a precision strike aircraft. Using somewhat early stealth technology, its angles and the materials used in it afford a high resistance to detection by radar, by breaking up the beam and not supplying a reliable return. Its antennae and beacons used for normal flight and communications are retracted for attack, as they will magnify the radar return many times over. The canopy and FLIR/DLIR windows are gold-tinted due to the material used for the same reason. Even the pilots' helmets have to be "unusual" or they will help give the aircraft away! When flying into civilian airports (for example, for one of the many airshows they've appeared at,) special hexagonal shaped radar "reflectors" have to be fitted so the aircraft can be tracked by air traffic control. This is an amazing aircraft, and yet - it's 25-30 year old technology... who knows what's flying now?
The kit:
Prior to this kit (and not long after the aircraft was first revealed,) the only F-117 I'd built was the Testors model in 1/32. Big, impressive, and accurate for its time, the kit is (unfortunately) long gone from my collection, and I'm not sure the kit itself is available any longer. Fortunately, in 1:48 scale, two impressive entries came out at about the same time - one from Tamiya and this one from Revell-Monogram.
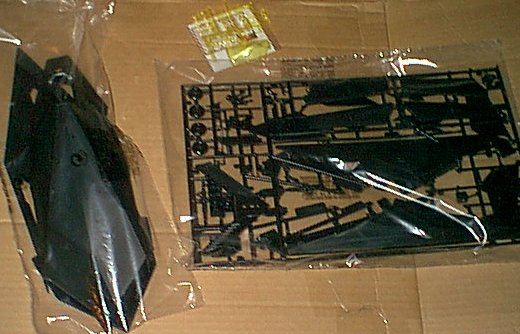
Revell-Monogram has molded this kit in black plastic - a good thing, until you try to paint it. Painting white (for the undercarriage) over black may seem hard enough - but wait until you try painting black over black. A good grey plastic would have been much more welcome. That having been said, this is an impressive kit. There's not a lot to it, as you can see from the kit layout. The upper and lower fuselage halves have been molded as one piece each - the only way to realistically do this without causing some odd seams. (The Tamiya kit also does this, as does the 1/32 kit I mentioned earlier.) The moldings are very sharp, and look very good.
The kit includes two very nice things - a gold-tinted fret of clear parts, which saves you from having to figure out how to "paint" that (actually simple, I'll be adding it to the tips page soon) and a fret of photoetch for things like intake and exhaust grilles. This is a decent way to do this in this scale, as plastic just wouldn't quite cut it. The photoetch is simple enough that if you've never used the material before, this would be a great kit to start trying it out with, as for the most part the photoetch lays flat on the surface of the model.
The kit depicts a Gulf war veteran, known as the "Toxic Avenger." Outside of knowing the aircraft codes, though, you can't tell - since "nose art" would possibly compromise the radar signature, these aircraft carrry "bomb bay door" art, visible when the doors are open. That's the weak point in this kit - the bomb bay is not open. This saves R/M a *little* bit of grief - the weapon doors' design has changed over the life of the aircraft in noticable ways - but leaves the model looking somewhat... thin. The Tamiya kit does include one - if you really want one, though it'll cost twice as much as the R/M kit.
The kit instructs you to paint everything black (for the most part, with the landing gear white and interior areas grey. This ends up being rather monochromatic, and slightly wrong. To give you a preview of what I'll be doing, and how to liven up your model a bit:
Finally, I'm considering going to Meteor Productions and picking up their presentation sheet for the F-117. This aircraft (two, actually, one in grey, one in black) has a giant US Flag design on the bottom, which definately adds color to an otherwise "solid" looking aircraft.
So far, it looks like a good build. We'll see as it goes.
Well, as the saying goes, don't judge a book (or a model) by its cover.
This was not a horrible build, but some of the parts that "test fit" nicely... er, well... We started off reading through the instructions to find what we could build as "parallel assemblies." I started with the cockpit - which isn't bad. I wouldn't go overboard with detail, as it is *very* hard to see anything through the tinted canopy. The tub was painted, as was the seat (for a bit of color,) and the instrument panel was dry brushed. This was added to the top fuselage half, and left to dry.
In the meantime, I assembled the wings - not difficult at all, though they do have two clear "lights" per wing. Remember to put them in. The yellow color... well, should make tinting them interesting. I can't find a reference on just how visible these lights are, so I didn't really bother (yes, I know, blasphemy!) I also assembled the twin tail surfaces (four pieces each) - these you MUST watch how you trim, or they'll fit oddly. This was also where I hit the first gap, but I take it to be from the difficulty of masking such an odd shape surface. Still, there wasn't much that needed filling. These were put aside to dry.
There are a lot of windows for various bits and pieces on this aircraft. The next thing I did was attach the forward and downward looking IR scopes. I fit the window for each into its spot, then just touched the liquid cement to the edges and let it flow in. Once those were secure, I added the actual "turrets" for each. Very quick and easy assembly. The lower turret also has the nose gear bay attached.
So far, so good....
 Once everything was dry, it was time for the main "assembly." I added a fishing weight to the lower body half, behind the cockpit area (just ahead of the area where it appears a bomb bay attachment would go - probably in the "ProModeller" version. If you buy this and choose to scratchbuild - !! - the bomb bay, use this for your side dimensions.) The wings were fit to the lower fuselage and lined up, and sandwiched into the upper fuselage. There are posts that go through the lower fuselage - in oversize holes. You will need to do some filling for these. I left off the radar reflectors (small quadralaterals, meant to reflect radar so they can actually land at civil airports and show up on radar.)
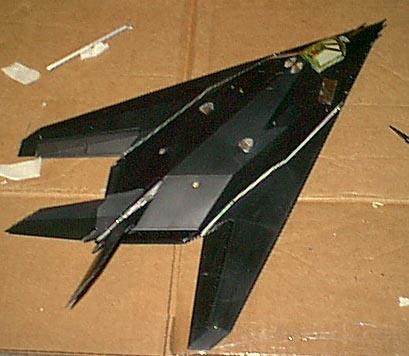
This is where the most filling needed to be done. As you can see from the picture, I had to run a full bead of filler along the wings. The rear of the aircraft refused to go together with the exhaust "platypus" added. I tried every trick I could think of - including "tacking" it together with superglue while the liquid glue set. That didn't work. It did, however, manage to stick some of the tape to the airframe, and mangle the rear corner 'edge' by the exhaust. Time for more filler...
Once all that was set, I masked the windows, added the canopy, and added the tails... or tried to. The tails have no positive "attachment," and I ended up cutting off most of the alignment tab on each side as they were more of a hinderance than a help. They broke off at least twice more from here until the end (including while putting on a decal!)
I painted the landing gear, and set it off to the side. And finally, I spent a good 15 minutes or so trimming out the photoetch grilles and trying to fit them to the appropriate places. Most are perfectly fine, but the intake grilles are a pain. Try to fit them to the lower edge, and align them as best you can. There's no good guide for them.
Despite what I said earlier, I looked through several pictures of the actual aircraft - and decided not to try to "multi-tone" the aircraft. (If you REALLY want to, the early ones were tried out with a sort of camoflage that didn't last very long. After all, "real pilots don't fly pastel airplanes.") The faceting actually breaks it up enough to show some interest in the shape, unless you're looking at it in a very dark room... .So, flat black it was....I took the easy way and just used a spraycan of flat black. Two coats to make sure I got all the "shiny spots" and it was ready. I also painted the outside of the landing gear doors (the inside already having been painted white.) The tires and brake hoses were painted Aircraft Interior Black (actually dark grey.) This was allowed to dry, and the landing gear and doors were added. (Add the doors first for the main gear, it's much easier.)
As stated, there's not much.. visual interest "Nose art" is actually applied to the inside of the bomb bay doors, which aren't openable in this kit. Most of the markings are grey - which, on black, doesn't show well (of course, that's the idea.) Still, they were applied as needed, and the tail's weak attachment broke off again... more careful gluing, and it was set. The decals for the tail codes seemed thick - they had an 'edge' around them that the others didn't show. Some careful blotting and solvent application, and it pretty well disappeared. No silvering was apparent.
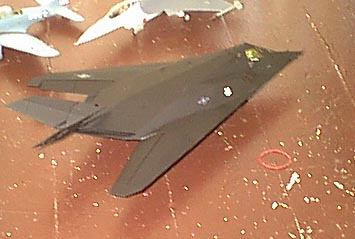 Finished, it was put up and out of the way - I don't want to reglue those tails again. I didn't weather the exhaust - I may tackle that later. And as you can see, the light breaks up the shape with the faceting enough for some visual interest... given that you can't really weather much of this aircraft, this is a good thing.
If you want a kit that'll go together over a weekend, and don't mind a little fit work, I can reccommend this kit. It's also easy (relatively) to put together, just remember the spots I'd mentioned and you'll get through fine. If you want more detail, or an open bomb bay, I'd suggest the Tamiya kit.