|
|
|
|
|
|
|
|
|
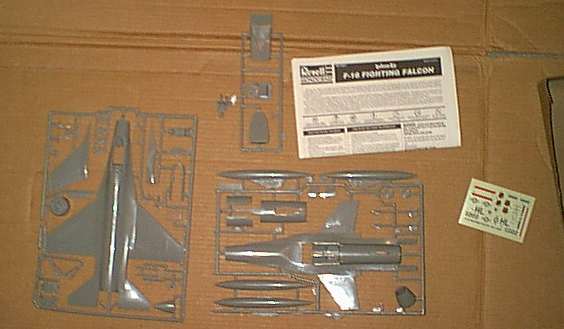
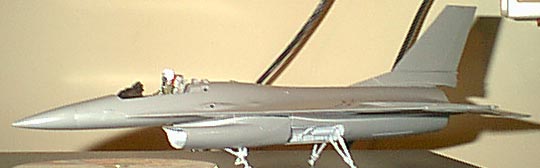
F-16AA Fighting Falcon "Deluxe Kit" |
|
|
|
|
|
|
The F-16 Fighting Falcon (also known as the "Viper" with later mods) is one of the Western world's workhorse aircraft. Initially conceived as a lightweight fighter and counterpart to the F-15, it's become quite the warbird in its own right, hauling incredible loads of bombs and missiles while maintaining amazing agility.
The F-16 is used by many nations, including the USA, Israel, Denmark, Norway, and Venezuela - plenty of options there for unique color schemes. Later variants have uprated engines and avionics, and have seen service the world over.
I picked up this kit of the F-16 at a warehouse outlet mall here near Madison, WI. It was cheap, and it's been years since I've built an F-16. For $6, I couldn't really go wrong.
Opening up the box, you notice there aren't many sprues in it at all. You have one marking choice, three grey and one clear sprue, a brush and three paints (best ignored.) If you want to give this to your kids, they'll love it - but if you want to make a model for yourself, you'll need to do some research and scratchbuilding or replacing of parts.
The main body halves themselves (split top and bottom) aren't bad, and look "right" in shape. I'm not one of the micrometer crowd - if it looks right, it's close enough for me. It fits well, though the soft plastic warped slightly - noticable only under the wings. This is an easy fix. The landing gear looks simple and easy to construct. The plastic is soft (very,) and feels slightly greasy - you'll want to wash this kit's pieces before really setting to work.
The cockpit is one of the places this kit falls down. I've come down hard on Hobbycraft for having weak detail in their cockpits. This kit has none (except for ejector pin pads.) Now, granted, you won't see much inside anyway (unless you open the cockpit,) but the cockpit here consists of a tub shape, ejection seat rails, the seat itself, and an instrument panel (which does, of course, have detail on it.) The kit also comes with a pilot (in my example covered in flash) with the sidestick in his hand - and I'm assuming he's there to cover a lack of detail.
The kit's painting instructions are geared toward the paints included in the kit... great, again, if you're giving this to a kid for his first "glue" kit, or something for him (or her) to play with when they're done "building" it with you. But everything's listed as either black, aluminum, or light ghost grey. If you want to build this kit up for yourself and detail it, go online (F-16.net is a good source) and go look up colors.
This kit should be a quick and easy build. It is geared towards kids, frankly, and it's a great introduction towards building 'glue' kits. The person who wants detail, though, will have some work cut out for them. I can see using a number of these kits (much cheaper than the Hasegawa F-16s) to show off anniversary schemes, with a darkened canopy to avoid the lack of interior detail. For a 'canvas' like that, it would work wonderfully.
I deviated from the assembly sequence here. Everything is a set of relatively unrelated subassemblies, so this is not a problem. The kit instructions would have you start with the landing gear. I waited on this, since I was waiting for the flat white paint to dry (not noted in the instructions. According to the instructions, everything is either Light Ghost Grey, Silver, or Satin Black. Check your references.) I prepainted the landing gear and bay, as well as the front landing gear and doors, and the engine intake. All of this should be White.
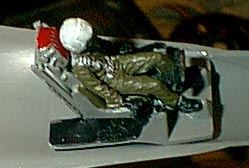 I also painted what I could in the cockpit. As mentioned above, there just is not much detail in the cockpit at all. It consists of five pieces - the tub, the instrumetn panel, the seat, ejection rails, and the pilot. I painted the tub Light Ghost Grey, with Black consoles (completely lacking ANY detail, though with the pilot in, you can't see it anyway) and a black instrument panel, highlighted with silver artist's pencil. I painted the seat and gave it some detail. I nearly added seat belts, but I was planning on adding the pilot. A note here... the instructions make a note (a very odd one, which I misinterpreted and which caused me problems later!) not to glue the seat to the cockpit tub. I read this as not gluing the pilot in (which works, anyway, since the pilot must move around.) This is where I hit the first fit problem. The pilot, sitting in the seat (if it's glued down *cough*) doesn't fit very well in the cockpit. Don't glue the seat. Trust me. Glue the cockpit "assembly" down, and let dry.
Once this is dry, glue the fuselage top and bottom halves together. Yes, you are basically almost done.
While waiting for this, I assembled the fuel tanks and rear tail asembly. You may want to prepaint and assemble the afterburner components, too... though to be honest, I'd hold off a bit. You'll see why in a moment. I also assembled the intake (which required a good bit of sanding and scraping to remove the seam,) and put the nose landing gear on. Backwards. Oops.... That got fixed later. I'd strongly suggest using the blanking "plate" given in the kit - the inside of the intake is a mess, with seams and locating pins everywhere.
Once the fuselage was dry, I flipped it over and worked on the landing gear. The main legs didn't fit all that well - one side insisted on staying up. With judicious application of super glue, ths was fixed... pretty much. I also test fitted the intake at this point. UGH! Scrape down the middle gap for the landing gear legs, so the central plate can actually meet the fuselage. 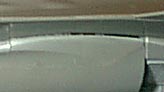 The rest of the landing gear assembly goes together rather well, though the forward arms (not the retraction jacks, not that anything's actually named) are very vague in placement where they meet the main gear legs.. Yes, I guessed.
I then fit the nose cone on - gaps were evedent all around, even after cleanup, so I went for as smooth a transition as possible, and puttied and filed the rest. The lower canopy frame was added, superglued into place, and allowed to dry. No color information is given here as well - from pictures on the aforementioned F-16.net site, it appears the area under the rear (fixed) part of the canopy is black. I painted it and the front with Aircraft Interior Black, then fit the gunsight. The pitot tube (cut short) found a home now, too.
Once all THAT had dried, I fit the tail on. The tail itself wasn't too bad, needing only a small strip of filler along one side (plastic card would work here, too.) It set down nicely on its perch on the back of the fuselage. I then tried test fitting the engine nozzle.
Ugh.
The nozzle pieces are molded decently, and fit to each other nicely. Looking at mine closely, though, it looks as though the end is deformed. Fitting this to the end of the fuselage only reinforced that opinion. A good bit of the inside wall was scraped away to get it to fit on the end of the fuselage. Once this was glued on and fitted as best as I could,the glue was allowed to dry. In some spots, there was up to 1 mm of plastic sticking out on the sides. This was cut and scraped away - I'm not sure if this is a mold creation problem, or a molding defect. I'm reasonably sure it was a defect in my example, but watch out for this.
I last added the details, such as the rear strakes and arrestor hook. Then, on with the canopy. If I'd had some, I'd have tinted the inside with some translucent yellow or gold, to replicate the appearance of the real thing. Alternately, I'd just black it out, given the cockpit...er, detail. Which brings me back to that thing about not gluing on the seat... WIth the seat glued in, even with the pilot loose, I could NOT get the canopy to fit. It kept bouncing off the pilot's head. So, out with the pilot... and it fit perfectly. Arrgh... and me with no detail in there. Oh, well, maybe next time. On to painting...
I completely ignored the paints given in this "deluxe" kit. Don't ask me how they were... Instead, I got out my PollyScale paints and some good, sable brushes. (Yes, I do have an airbrush, and this would be ideal, but it's not set up at the moment. Ahh, the joys of moving.) I started out painting the undersides, vertical tail, and about the front 1/3 of the upper fuselage in Light Ghost Grey. I'll say this - Pollyscale's acrylics seem to love to be brushed. Not a brush mark in sight! Good brushes do help with this, too... Two coats of this pretty much takes care of coverage. The paint does cover well. This was allowed to dry, and I pulled out some Gunship Grey... I'm not sure just HOW correct this is, but it looked right compared to photos. It may also be Dark Ghost Grey - but gery looks grey, and the diffeerence appeared to agree with what I saw in photos. This was painted on the rear fuselage, and feathered in gently with the front Light Ghost Grey using the bristles of the brush. It actually turned out better than I thought! The small frame on the canopy was carefully hand painted, and everything was allowed to dry. I then attacked the engine area with silver paint. This will be weathered slightly later, which will darken the paint somewhat, but for now it doesn't look bad.
The decals behaved... eh, reasonably well. The upper refulelling point markings didn't really want to cooperate, and I'm still working on eliminating wrinkles and silvering a day later by slitting the decal, adding water or setting solution (they react decently to Solvaset) and tamping down. The other decals went on very nicely., and settled over the raised panel lines without a problem. The markings are for a fighter of the 388TFW, and provide a little color (though not much...) to an otherwise grey model.
This is a fine kit for someone to give to a kid who just wants to glue it together, and doesn't care about nit picky details (like, oh, an empty cockpit.) If you just want a model to throw together to try out some paint schemes (possibly blacking out the cockpit,) this would work, too - though it does take a little work. For $8 (I got mine for $6 at a Kay-Bee clearance store) it's not horrible, and even the little work you do have to do isn't too bad. If you want a contest-winner, though, I'd suggest spending a little extra money and finding one of the Hasegawa F-16 kits (which I've seen released for around $16-$22.) The better fit and detailing is a much better starting point. Reccommended, with reservations, for a weekend project or - as mentioned - given to a 'young 'un.' - Eric