

|
|
|
|
|
|
|
|
|
F-84F Thunderstreak |
|
|
|
|
|
|
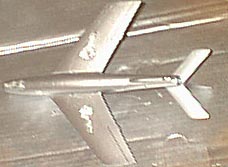
The Republic F-84 was Republic's first foray into the world of jet powered aircraft. After an initial offer of what was basically a jet-powered P-47 Thunderbolt was seen as unworkable, they were given the chance to rework their offering. The result, the F-84 Thunderjet, was a single seat, straight winged aircraft which served alongside the F-80 and F-86 in Korea as a successful fighter-bomber.
The F-84F was the swept-wing derivative of the F-84. Initially, a jet/rocket hybrid with swept wing and tail surfaces was supposed to follow on to the F-84. After testing, ti was decided not to proceed with the aircraft. Republic was initially planning on offering the swept-wing Thunderstreak as a new aircraft, as only 15% of the airframe was kept from the straight-winged F-84E. However, with no funding coming for new aircraft designs, it was decided to just offer the jet as a new "variant" of the extant F-84E/G. Initially underpowered, the F-84F did not offer much of an improvement. Once a more powerful powerplant became available, though, the F-84F lived up to its potential. Unfortunately, it could not compete with the successful F-86 Sabre, and maintained Republic's aircraft's role as a versatile fighter-bomber instead.
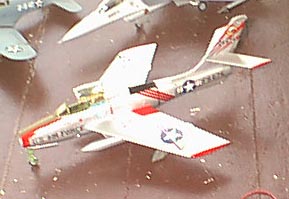
Besides the U.S, other countries, including Italy and Germany, used the Thunderstreak for some time. U.S. aircraft were capable of "over the shoulder" delivery of tactical nuclear weapons (one of which is included in the kit) - basically overflying the target, pulling into a loop, releasing the bomb near the top, then finishing the loop and speeding away as the bomb fell.
The Kit
 The kit itself is typical of 80s-early 90s Revell-Monogram kits. Panel lines are raised, but very fine. Detail is abundant, and fit for the most part is excellent. Attention to detail is apparent throughout the kit, with only one or two "odd" areas. I've always liked the look of this aircraft - it seems more elegant to me than its F-86 contemporary, but is not as well known. It helps emphasize that the designer's art does not have to be just math and computers, but can truly be 'art' as well.
The kit comes in several sprues of good plastic, slightly greenish-grey in color. The clear sprue is actually very clear, without a great deal of distortion. All parts were in good shape, with no warpage or much flash at all.
Construction
 Construction, unsuprisingly, begins with the cockpit. I painted the instrument panel flat black, and set it aside to dry. I also prepainted the cockpit and ejection seat pieces. The ejection seat is nicely detailed, though how the headrest (13) fits is not immediately apparent from the instructions. Prepaint the actual seat, it'll make detailing the buckles and straps much easier. The headrest should be attached last, after the sides are attached to the seat. The headrest fits on the front of the standoffs at the top. Once the paint had dried (Interior Green, mostly, with black details) I attacked the instrument panel and side consoles with a silver artist's pencil to bring out detail (which worked quite well - the detail is raised and nicely done.) I could not find color photos of the cockpit, so I highlighted some switches and such with dots of paint.
I did not use the pilot figure. It's well molded, I just didn't want to use it. I painted the inside of the fuselage interior green, with more highlight painting. The forward area (by the intake) was painted silver. The intake splitter and nose gear well were also assembled and painted - don't forget to paint the outside silver as well as the inside (interior green.) It's a tough spot to get to. The area behind the splitter plate, and just under the cockpit, provides plenty of room for the nose weight of your choice. Use it. I intended to... and forgot. This was fixed later....
The jetpipe is assembled next. Don't forget to add the fuel dump pipe, as well as the two... I'm not sure what they are, part 47, to the interior of the engine. The rear face shows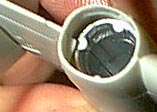 a seam that's impossible to fill. You may want to create a "disk" of plastic and detail it so this isn't as obvious (the two parts 47 hide the seam at the end of the jetpipe.) This is added to the rear of the fuselage. An alignment pin also is right at the end of the tailpipe. Use it to help align the fuselage when gluing it together, then trim it off as shown in the photo to the left (in progress.) It's easy to get to.
While the fuselage halves are drying, assemble the wings. Remember to prepaint the wheel wells. The wings fit together beautifully, and lock together when placed inside the fuselage thanks to the nice "tab" system on the ends (one upper, one lower, on each wing that reinforce each other.) The tailplanes also have the same arangement, though there's no "left" or "right" handed side. Someone was thinking ahead!
 Once all that is assembled, the "fiddly bits" get added on. The inside wheel well wall and wheel well door are supplied as one unit. They almost snap into place - I pushed them in, and secured with a drop of glue. It's a well engineered, tight fit. I can't say the same for the landing gear legs - they snapped off at least four times during assembly. If I build another, I'll leave them off until the very end. (I waited until I painted the silver base, which was about this point.) Still, it's a clean design, and easy to paint details such as the brake line. The outer doors are self aligning. The placemnt of the retraction cylinder (pt 63) is not all that clear, and is a pain to get to. It doesn't seem to rely on the landing gear leg at all, just the post already in the wing. Add it before adding the gear (one of the points at which a gear leg snapped off., for me.) The nose gear is a three piece affair. Don't cut off the torque link like someone *cough* did...
I decided to display my model with the airbrakes shut, so as not to break THEM off or ruin the lines of the model.
I skipped some steps here and there, such as fitting the front and rear canopy early and masking them. The interior, rear area, should be olive green according to the instructions. I found photos online showing grey and black, as well. If you have photos of the aircraft you're modelling... use them. I also realized at this point that I'd forgotten to add the nose weight! This, of course, came after I'd already glued the drop tanks and nuclear bomb together. Arrgh...
I opened up one of the drop tanks, and loaded the front with fishing sinkers. Fortunately, this didn't take much work - and is a good place to add weight, as well. I'd checked online, and the smaller tanks (given as outer wing tanks in the kit) were also able to be carried on the two stations close to the fuselage. I decided to mount them there. not only are they "cleaner" looking, but it would move the weight forward. I just had to fill one side, and the model stays on its gear as it should.
I decided to just use the inside pylons (swept back) instead of all four. If you choose to use all four in the kit default configuration, leave the outer pylons off until after decalling. The insignia and "USAF" markings go underneath them. The pylons are four parts a piece - a left and right side (yes, they're thick,) and two braces. Trim the inside of the braces to fit if you don't use the default setup (like I did.)The tanks are very picky about where they fit. I added everything at this point - yes, there are gaps there. This is one of the less-nicely-fitting areas of the kit, but with a bit more finnessing, you may be able to get rid of them.
I haven't assembled the cart yet, and chose not to use the JATO bottle assembly. I may add it later - it's two parts, and is nicely done.
The canopy, as mentioned, is nice and clear. Unfortunately, it doesn't "sit" right, leaving gaps. I also managed to break off the rear windows (part 71) at one point AFTER painting! So, there's a small gap there now. It was removed and assembled in the open position - step 27 shows the middle canopy from the REAR, so make sure you're pointing it the right way. Don't sue superglue - not due to fogging (which can be prevented with Future) but because you'll need time to set up the legs. Also, for the rear canopy, Monogram supplies two black decals that go INSIDE... why, I'm not sure, as I couldn't find photos like that anywhere. I ignored them.
Painting and decalling
As I'd mentioned earlier, I painted the aircraft early. I masked the canopy, and masked the wheel wells with aluminum foil (easy to stuff in and shape.) I didn't do anything all that fancy - given that my airbrush nozzles aren't in the state with me after the recent move, airbrushing was temporarily out of the question. I simply bought a spray can of Testors' silver paint, and did an overall silver finish (a working airplane like this will dull somewhat, and it's just the right finish.) I then went looking for my SNJ Spray Metal, and realized that it was ALSO in the old house. Fortunately, I still had the polishing cloth with some powder on it. I polished the leading edge somewhat, then brush painted a few panels with Stainless Steel metalizer. I hand painted the nose anti-glare panel Olive Drab. All togegher, this gave just enough variation to be interesting without a "patchwork" effect.I unmasked the canopy, and hand-painted the yellow sealant around the edges of the windows. I then removed the canopy and worked on getting it into position again (I really wish it could have fit closed, but it shows off the interesting method used to open and support the canopy on this aircraft.)
Decals - The decals are somewhat "thick" feeling, but not overly so. Unfortunately, they also cover some vents and a pair of gun barrels! The latter can be fixed with decal solvent and a knife, but the former... trim out and paint. (It's the black area on the spine.) The red stripe decals fit perfectly between the airbrake and the black area, but if you don't quite trust yourself, put the mid-fuselage decals on in this order - 1. Black stripe (NN and OO,) Stripes, then the Black patch on the spine. The rest of the decals went on easily and snuggled over the detils, with the exception of the wing root (HH and II) decals. I'd suggest painting them, as they do not seem to want to settle in to the raised, 'perforated' panels very well on the wing tops. I'll try a stronger solvent later. Aftermarket sets for this aircraft are also available. You may want to look into them (DACO decals, among others, carries them.) But all in all, it's a nice, well thought out set of decals, and very colorful.
Conclusions
 This is a very nice kit, with no real vices or problems in it. It's also a gorgeous airplane, and I think is going to spur me on to making more of my Republic lineup (P-35, P-47, all the way through the A-10.) I look forward to building the Tamiya straight-wing F-84G, finding a Heller Thunderflash (based on this airframe, but different...) and seeing about modifying the Revell F-84G into the F-84E which it is closer to. I highly reccomend this kit to all but absolute beginners - this would make a perfect second kit.