
|
|
|
|
|
|
|
|
|
F86F-30 |
|
|
|
|
|
|
A little history, and then we'll get to Mike's review.
After WWII, a few things happened to the US Army Air force. First, it found itself trimmed down greatly in size. There are photos documenting piles of P-38s, P-51 Mustangs, and the like, fresh off the assembly line getting sent to the scrap heap. Second, it became an independant service, dropping the "Army" portion of the name and becoming the US Air Force we know today. And finally, it was shoved into the jet age.
Pilots started reporting strange, high performance, swept wing fighters being used by the North Koreans and Chineese. They outperformed anything in theatre, and could savage the fighter bombers and the B-50s with near-impunity. In a panic, the USAF grabbed all the F-86 Sabres it could find from the US and Japan, and sent them to Korea to deal with this new threat.
The F-86 and the MiG-15 (this "mystery fighter") shared common roots. Both still used "Centrifugal flow" engines such as the Rolls Royce Nene (copied in the MiG-15) instead of the now-familiar "Axial flow" (seen in aircraft like the ME-262 and today's F-15 Eagle.) Both owed their designs in great part to captured German aeronautical data - data which our engineers admitted saved us decades of research. The designs were so similar, in fact, that the F-86s needed recognition markings (normally seen as yellow stripes) to help distinguish the two.)
Performance of the two were very similar, with the MiG-15 actually somewhat superior in climb and maneuverability. The F-86, however, came out the victor, primarily due to the US pilots' better training and somewhat better armament - six .50 cal. machine guns vs. 3 mixed-caliber (and slower firing) cannon. The F-86 also went through a great deal of development, with devotees picking up on details such as "6-3" wings, "hard" wings, and the like. Its performance in Korea and general appearance ensured it a place in history.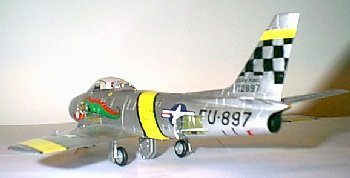 At the outbreak of the Korean war, the USAF was undermanned and underequipped. It also found itself in a time of transition, with B-50 (updated B-29 Superfortress) bombers, F-51 Mustang and F-82 Twin Mustang propeller driven fighters, and its first jets, the F-80 and F-84. These were deemed sufficient to deal with Korea in 1950, until...
This is the Hasagawa depiction of the US Air Force F-86F-30 variant.
The kit is number 07072, depicting "The Huff." My inspiration for building this version is based on seeing the actual plane on display at the Experimental Aircraft Association (EAA) Fly-In a number of years ago.
The instruction sheet depicts one of the other decaled versions that Hasagawa offers. Hasagawa then includes an additional instruction page with decal variation instructions for this particular plane. [Ed. note - this is not unusual with Hasegawa, as they will create a basic kit and then remarket it with "special" markings and/or resin bits - see the Hasegawa ME-109G Nachtjaeger or A6M5 Zero reviews for more examples of this.]
Instructions were straight forward, easy to understand. Print is in both Japanese and English. Included is a brief history of the F-86, as well as a good paint/color guide.
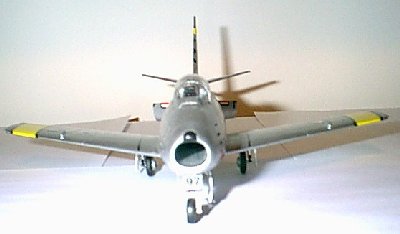
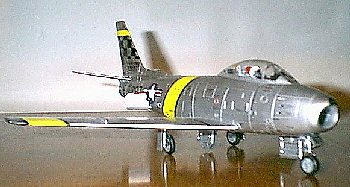
Overall, this is THE MOST ENJOYABLE aircraft model kit I have built. The air intake duct, cockpit, landing gear bays, landing gear, and exhaust assemblies went together smooth and seamlessly. The main wing assembly, one lower piece with right and left wing upper halves, went together with minimal seam sanding required.
The fuselage went together nicely. Normal sanding was required, however. The middle of the back, between the back of the canopy and the leading edge of the rudder required a bit of filing and sanding. The same attention was necessary on the bottom, between the back of the wing assembly and the exhaust outlet, and the area from the nose piece to the leading edge of the canopy.
 One thing to note, a good amount of weight was required to load the nose
down in order to sit correctly. I used two round magnets, from a generic
roll of them, purchased at the hardware store for a couple bucks. They were
glued to the top of the intake duct assembly prior to putting the fuselage
halves together. The elevator pieces were in one piece each, no halves.
One thing to note, a good amount of weight was required to load the nose
down in order to sit correctly. I used two round magnets, from a generic
roll of them, purchased at the hardware store for a couple bucks. They were
glued to the top of the intake duct assembly prior to putting the fuselage
halves together. The elevator pieces were in one piece each, no halves.
Paint was done with Testors Aluminum Buffing Metalizer, shot from a rattle can. Then sealed with their sealer. Canopy framing was tape off and brush painted on the straighter edges, free hand on the curves. The nose tip is free hand, as well as the air brake doors (I screwed up the decals for them). Landing gear and all other detail is free hand painted.
Decals went on smoothly using Poly-S decal solvent. Of particular note is
the instrument panel decal. The panel was painted semi-gloss black, then I
added the decal over the raised surface using the solvent. It snugged down
instantly and looks great! Particular care is required with the lineup of
the stripes. With using the solvent there is no room for error.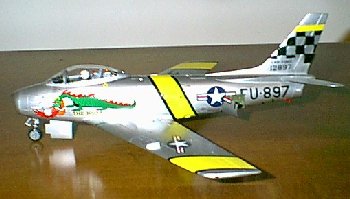
I did encounter one major problem that stopped assembly for a while. The kit did not include the two upper wing halves. It came with two lower half pieces. Thankfully the shop I bought the kit from was willing to rip open another kit off of his shelf and get me the pieces I needed.
All in all, a kit I very much enjoyed building.