|
|
|
|
|
|
|
|
|
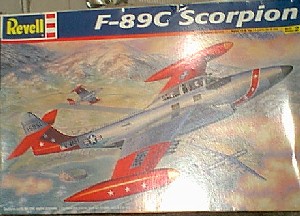
F-89c Scorpion |
|
|
|
|
|
|
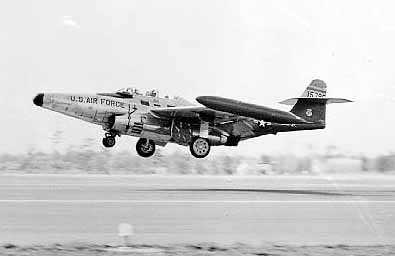
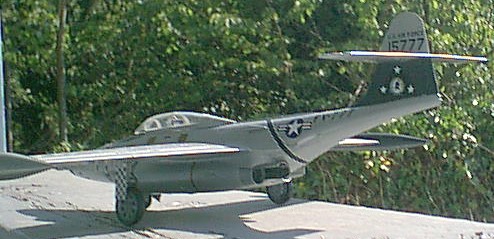
 The F-89 Scorpion was designed as a bomber interceptor. It was meant to go up, loiter, and knock down incoming Soviet bombers before they reached U.S. shores. As such, while the F-84 Thunderjet and F-86 Sabre were reaching higher speeds and obtaining swept wings (in the F-84F variant of that family,) the F-89 was a big, straight-winged aircraft. It would never attain exceptionally high speeds, but it didn't need to.
The F-89C model was armed with six .50 caliber machine guns - armament not much different from the fighters of World War Two and Korea. Later variants would forgo guns completely in favor of salvoes of unguided rockets.
I'd originally built a kit of this aircraft years upon years ago (I'm pretty sure it was 1/144 scale,) and gave it a maroon paint job with "scorpion" markings - while I won't do that with this one (I hear your disappointment) it still cemented this aircraft in memory, and left me intriegued with the little-known bird for years. When I saw this in 1/48 scale a few years ago, I snapped it up.
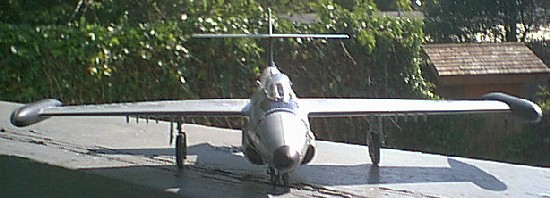
This is an older Revell-Monogram kit. It comes in a decent sized box (about the same size as their 1/48 B-26, but a bit thinner.) This is your first hint about how BIG this airplane is! Inside are a few large sprues, bagged for shipment. It's an unusual kit to see, as it is - though I'd seen them in smaller (1/72 and 1/144) scales, 1/48 is not all that typical. It's an unusual choice for what you may consider an esoteric aircraft. But it builds into an impressively sized kit.
 It has what some seem to think is a mortal failing of some "older" kits, raised panel lines (I don't mind them, but if you do, well...) The clear parts are molded nicely and are quite - well, clear, no distortion apparent. There is some flash, but not much - definately nothing to worry about.
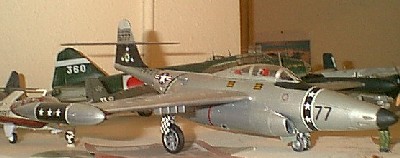
The kit comes with a decent looking decal sheet, which has two variants to choose from - one from the 57th FIS in Maine (black and natural metal,) and one from the 74th FIS in Greenland (shown on the boxtop, in natural metal and red.) I'd choose ahead of time which you want to build (if you don't use an aftermarket sheet,) as your choice of paint schemes can influence your building if you plan
ahead.
 Construction, suprisingly enough, doesn't start with the cockpit, but with gluing the fuselage halves and nose together. This gives you an immediate indication of just how LONG this airplane is (but leaves the wingspan as a suprise.) The nose on mine didn't fit quite right, and took a good bit of puttying and sanding to blend in. DO NOT trim off the "spine" on the aircraft - it is supposed to be there (part of the canopy rail,) and is a nice break in a natural-metal aircraft as it's mostly one less seam area you have to fret over. The nose area did need some seem work (top and bottom) however - there was a slight "step" inward, as if one half was slightly warped or had curved in a bit more. This is also the point where you want to add nose weight - I had some of that poster-sticking-gum (I don't know the name of it, right offhand) that I wadded into a ball with a variety of fishing weights. It seemed more than enough to keep the nose down, even with the weight of a tall, heavy tail. Do this, and you can ignore the later "drill out and add clear plastic post" steps (which makes for a better looking model, in my opinion.)
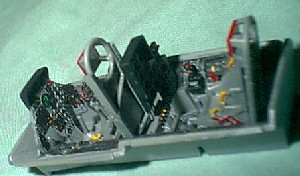
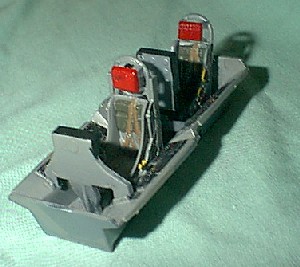
The seats themselves come out nicely - they're reasonably detailed (and I don't know of any aftermarket seats for this aircraft.) I paitned them, though the front seat (step 1a) was slightly confusing at first. Look closely at the "rails" on the sides, and you'll see two indentations (which I initially took for ejector pin marks.) These help connect the sides to the seat back. I was very glad I didn't get around to filling them in yet! I put them on, and fit the pilot seat in between them, then set this seat aside to 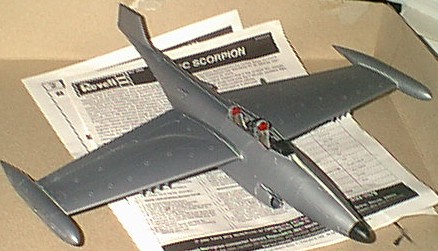 dry. I then worked on the radar operator's seat, which goes together much easier (to me, at least.) Everythign locates much more positively. As these dried, I painted the cockpit tub and instrument panels.
When everything finally dried, I assembled the cockpit. One hint, leave the rear seat out at this point (not what the instructions tell you to do.) As I initially had it, the canopy would not close because the seat insisted on 'reclining' back too far.
The next step has you fitting the cockpit into the fuselage. I had what looked like a big mold "pip" in one half of the fuselage, but it worked quite well to support one side of the cockpit. The front instrument panel butts right up against the rear edge of the opening. Wait to put in the rear seat (or trim out part 14. the canopy frame, and use it to test fit the seat location.) The "foot pan" supports fit right over the spar in the cockpit.
I then added the intake fans (with very slight shading) and the fuselage bottom. The fuselage bottom needed some fitting and fiddling - the very front 'tab' in front of the wheel well, and rear flange, are not the best fitting. Careful gluing and fitting will save you a lot of filler (not something you want to deal with on a natural metal aircraft, anyway) along the bottom. Work carefully. The bottom is supported by tabs from the fuselage side, so you won't push it in too far. Also, this is your last chance to add nose weight - or drill out the hole for the clear support peg. I also added the air scoops to the rear fuselage at this time.
 This is where I started deviating from the instructions. I assembled the exhaust fan and tail cone assemblies, but did not add them, as I wanted to put them in a different "metal" shade for some variety. I also left off the exhaust shields for the same reason. I ended up leaving the exhaust cone assemblies in natural "plastic" (it wasn't bad, with no swirl markings) and painted the exhaust shields a dark metal color. Just be sure to clean the tail cone out completely, or you'll have tabs left from the cruciform mold sprue inside. The front intakes took a little cleaning up, but fit on nicely with just a touch of filler on the inside edge.
While all this was drying, I glued the wings together. I left the landing gear off until later. You can, however, fit the large wheel well doors now (they fit flush to the wing - why they molded the tabs on them, I don't know....) This is where you have to start planning on how you'll paint the aircraft.... feel free to ignore my suggestions, but I think you'll see they work out rather well. Here's my suggestions for each on how to finish after attaching the wings (which needed just a touch of filler on each):
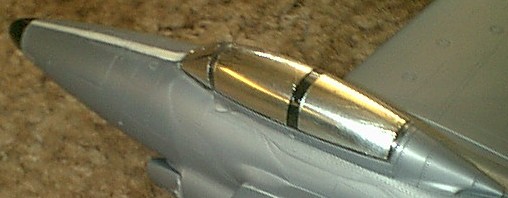
 Assemble the tip tanks, and attach them to the wings. On mine, I needed some filler here to fill in the gaps between the tank and the wing. I say this because the entire outer wing and tank are painted red. Don't try to figure out where to mask for the outline of the "USAF" and insignia, as they are given with silver surrounds. Put on the pitot tubes, but leave the tail off. Paint with your favourite natural metal product, paint the horizontal tail red, then finish assembly (don't forget the silver and grey of the tip of the tail.) Decal, then add the rockets (if you want) and landing gear. Don't forget the exhaust cones and shields!
OK, I goofed up here. I planned ahead, and ignored my own planning by attaching the tip tanks (it was late.) Attach the wings, but don't fit the landing gear or rockets (even the nose gear.) Test fit the tip tanks anyway, possibly attaching with WHITE glue (you'll see why in a minute.) Let dry, and do any filling that needs to be done. If you use white glue, you'll be able to detach the tanks once all this is done - it's not a faired fitting, it should be a sharp angle. This will help - you'll see why... Do not attach the tail at all.
Paint the aircraft - I went with silver from a spray can, let that dry, then buffed some panels with SnJ's polishing powder. Here's why I say to leave the tip tanks and tail off - the inside half of the tanks are painted gloss black, as is the lower tail (leaving the horizontal tail natural metal.) Leaving the tail off makes masking much easier, and if you leave the tip tanks off, you only have one surface to mask instead of attempting to mask the tank and wing.
 Paint the black areas (don't forget the radome) and let dry. As mentioned earlier, I painted the exhaust shields a dark metal color, and left the exhaust cones in their "naked" plastic color (which worked, as there were no swirl marks or such.) Add decals, then finish up with adding the landing gear (yes, wait until now, as adding the checkerboard to the main gear doors will be easier if you wait) and rockets (if you choose.)
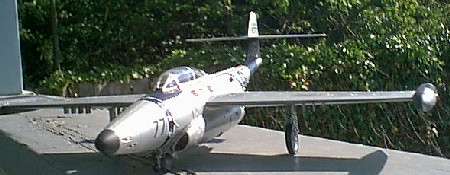
I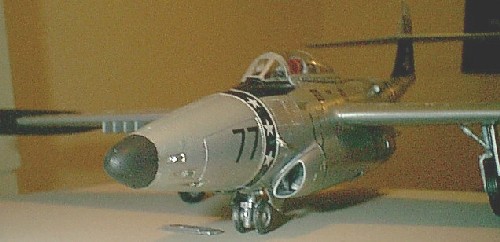 know I omitted mentioning the canopy. I masked it with bare-metal foil, which I now understand why people love for masking. It conformed beautifully, and you could see every detail on where to trim. It's rather expensive (to me) to use for this all the time, though. In any case, fit the windscreen, then fit the rear canopy to the frame. I tacked them onto the fuselage prior to painting, which left just a little touch up (if I choose to open the canopy) instead of trying to mask the cockpit "gap." Polish or highlight individual panels if you choose. Add the landing light and any other parts you may have left off (such as the horizontal and tip of the vertical tail - don't forget the tip is grey!) at this point.
Well, what can I say. If you've built it, you can see - it's a big model. It's as big as a WWII medium bomber. Still, it's a reasonably easy build, and different from most Korean war era kits. It doesn't take much filler or much fiddling around, and would make an OK kit for trying out a natural finish (realizing, of course, that they tended to weather to a dull metal finish anyway.) Recommended to just about anyone due to ease of assembly and low part count.