
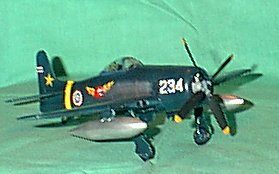
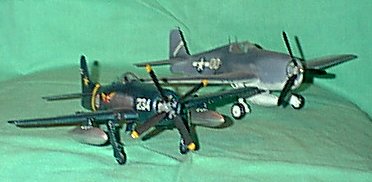
A photo of a 'live' Bearcat in Thai use, courtesy S. Promthep.
|
|
|
|
|
|
|
|
|
F8F-1b "Vietnam Bearcat" |
|
|
|
|
|
|
The F8F Bearcat was the successor to the great F5F Hellcat. Depsite the Hellcat's success against the Japanese in the Pacific, it was known that a successor would soon have to come into being to keep up with the rapid pace of aeronautical development. About the same time, some of Grumman's engineers were invited to check out a captured Focke-Wulf FW-190. They were so impressed with this fighter that they decided to make a similar aircraft for the Navy. Thus, the F8F was born.
There were several new features on the Bearcat. First, it broke the tradition of Navy fighters getting larger with each generation - this one was smaller than the Hellcat, about Wildcat size, but much more powerful. It was also the first Navy fighter with a bubble canopy. It also had a feature that was never used - the outer wing panels could be seperated from the aircraft in flight by means of an explosive cord. This was done to shorten the wing and (theoretically) improve maneuverability. I'm not sure how well that would have gone over - or the problems if one of the cords didn't fire!
The Bearcat, like its larger, twin engine F7F Tigercat relative, came in too late to see action in World War II. It did, however, serve with several air forces - the French, South Vietnamese, and Thailand all used it, as did the Navy's Blue Angels.
I typically come down hard on Hobbycraft. There have been several kits with problems in fit, accuracy, detail, and instructions. I'll have to admit, though... I'm impressed with this little kit. Sure, there are problems still - but fewer than I've run into previously. The instructions are still weak, but even they are getting better.
 The issues with this kit aren't hard to fix. The kit, as usual, starts off in building the cockpit. The cockpit is weak in detail - a third party resin kit may be available for this. Under a closed canopy, however, it will be hard to tell what's in there - some minor detail will go a long way in here.
The wings come next - and go together easily. If you don't want to use the underwing pylons for armament (bombs, fuel tanks, and what look like napalm cannisters to use on two of them - rockets, meant for the smaller stubs, aren't included) don't drill out the holes in the bottom wing. The upper wing cannon blisters actually fit nicely, but are somewhat snug. Use caution - they can disappear easily.
The rest of the kit does fit together quite well. The engine is nicely detailed, the fuselage and wings fit together without any odd problems - or gaps! One thing, colorwise - typically, the wheel wells on USN Bearcats (as well as the gear legs) were the same dark blue as the undersurface. In a recent magazine (Finescale Modeller, I believe) there was a shot of a Bearcat wheel well - the inside section of it (under the fuselage) was zinc green chromate, with black hoses (lines?) and other detail. The smaller detail is missing on this kit, but you may want to be sure to check the color, just to break up the monotony of the color scheme! The tailwheel, from what I could tell, should also be interior green.
There are very few nits to pick with this kit. But there are a *few* as well as a few areas to clear up.

Painting and decals. First, before painting, attach the canopy and mask it completely. Don't worry about the frames, Hobbycraft has done a GOOD thing to help you out.
 There are only two options as far as paint for these - bare metal, and USN dark sea blue. Markings-wise, there is a lot of color to make up for this. Either way, apply the color you want. Then unmask the canopy. Remember, you should have ignored the frames. Why? If you look in that box, you should see a small, white decal sheet. On that sheet are three sets of canopy frames... dark blue, not so dark blue, and silver. Hobbycraft have even taken care of the INTERIOR color - once you apply them, look at the inside. You should see an interior green color. Kudos to Hobbycraft for this. Second, Hobbycraft have broken up the (extensive) markings sheet - there are no stencils, unfortunately (though these aircraft, in the case of the Royal Thai Air Force example I built, were transferred from the French.) This takes care of most registration problems. Unfortunately, I still ran into the occasional sliver or white on the outside of the roundel for the Thai AF example.
I chose the Thai example for all the color it could add. They aren't sure if the markings are white or yellow, so Hobbycraft have supplied a band and nose numbers of both colors. I decided to break up the color a bit by using white numbers and a yellow fuselage band.
 The fuselage band is in two parts - marked on the sheet with "Forward" and "Top." (I wish more manufacturers would do this!) You should be able to fold the side with the excess over, or trim it off. The roundels (two-part items) went on easily, even on the underside (where they were split with a hobby knife to fit over a fairing on the wing) - I only had one crack on me, and it's (fortunately) underneath. They reacted well to MicroSol, and snuggled into the details.
Finally, I added some armament - the two, big Napalm tanks, finished with Rub 'n Buff Silver Leaf for a bare metal finish (again, to give some contrast.) Exhaust staining was done with grey and brown pastels, ground up and brushed on.
This kit was a pleasant suprise, given what I normally think of Hobbycraft. This would rank up with the usual Monogram kits (such as the BF-109 or P-47) for ease and pleasure of assembly. The only problems are, again, poor cockpit detail and poor instructions.... but Hobbycraft's getting better. I actually look foreward to trying out the Sea Fury, and may buy more Bearcats (such as the French or Blue Angels versions.)
Gladly reccommended to modellers of any skill level.