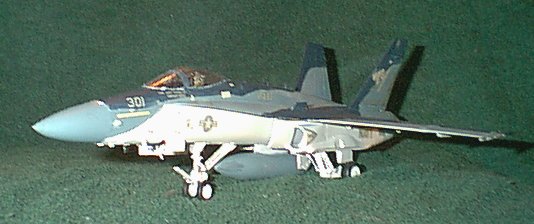
The F/A-18C, as entered in Aircraft Resource Center's contest in a nonstandard scheme.

|
|
|
|
|
|
|
|
|
F/A-18C |
|
|
|
|
|
|
History:
The F/A-18 Hornet is derived from the YF-17, which competed against the YF-16 in the USAF's lightweight fighter competition. While the AIr Force decided the Cobra (the name of the YF-17) didn't meet its needs, it did look much closer to what the Navy wanted in its next generation fighter. The F-18 is larger, and can carry more, than the YF-17 could, and after much development has been taking on the role of the late A-6 and supplementing the F-14 Tomcat.
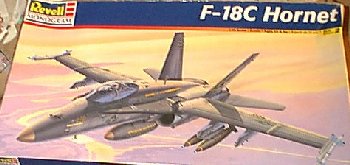
The kit
This kit has been around for a while. It started off life as an early production Hornet, then was updated to F-18C standards. Still, some inaccuracies exist - the blunt nose, for starters. (Check the Aircraft Resource Center for more details. You can tell, as well, from the mold's apparent wear, and the fine but raised panel lines.
You get several sprues with this kit. The wing is molded primarily with the upper fuselage, with the lower center section molded in to the lower fuselage half. They provide you with eight "iron" bombs and two Sidewinder missiles for armament, leaving the fuselage pylons empty. Other options require aftermarket sets. You do not get a choice of having the landing gear up or down - the doors are molded into the wheel well sides, and so must be posed down unless you want to undertake 'major surgery.'
You have a choice of two sets of markings (I believe this is the same kit issued earlier with "Chippy Ho!" markings, as well.) The first is the commander of the "Gunslingers" (VFA-105) serving on the USS Eisenhower, the other is for the Stingers (VFA-113) on the Independance. Given the overall grey/gray markings (and the fact that my brother served on the Eisenhower, though long before Hornets came on board,) I'll probably do the more colorful markings of VFA-105. (Assuming this kit doesn't get sacrificed for the Aircraft Resource Center's contest... if so, pictures will still show up, and at a price of $10, a second kit can be built.)
Building the kit
This kit is known for being cheap, reasonably accurate, and having fit problems. It did't disappoint.
 Unsuprisingly, we start with the cockpit. This contains "ok" detail - it's not all that bad, but a resin cockpit set wouldn't hurt, either. I painted it per instructions overall grey with black instruments (the Detail and Scale helped here.) I used gloss green paint on the CRT screens (not that you can tell...) So far, so good, but the seat itself is where you hit the first fit problem. Mine was slightly warped, and flash everywhere didn't help matters much. After much trimming and fitting, I got a reasonably facsimile of the ejection seat - again... resin would help. A paper template for the shoulder straps is given - cut this out, and attach it to the "clips" on the side of the seat. (Not a bad idea, and if done right, it looks somewhat better than decals.)
You put the cockpit into the upper fuselage half immediately. Fit is OK, but somewhat insecure - you may want to tack it with superglue, then regular model cement. After this, we hit one of the weak points of the kit - the horizontal tail. It's designed to be able to "tilt," but what it does best is break. Which it did rapidly for me. Two ways of dealing with this - Either trim the connecting bar completely and replace it with a length of metal rod, or trim until there are just "tabs" left and flare them to hold them into the fuselage. Personally, I prefer the metal rod. It's much more durable (and I don't care if the tail moves or not.) In addition, by doing this, you can add the tail later - which will help, as you'll see in a second. Add the jet exhausts, and determine which (if any) mounting holes you want to clear out for the underwing pylons. These are actually easy to locate later - they're still showing as "dimples" in the wing underside.
 Next step, next weak point - join the top and bottom fuselage halves. The age of the molds really shows here. Along the front sides of the fuselage, you'll require a good bit of putty. You'll also want to "squeeze" just under the leading edge extensions to try to minimize the gap THERE (a good millimeter or so) and work your way through the wings (which had an "ok" fit as far as gaps, but the underside was warped and required clamping) and finally to the rear of the fuselage. The rear of the fuselage is why I suggested replacing the plastic bar at the tail with a metal rod - you'll need a good shot of filler and time to do some seam work here. The tails only get in the way, and will break off if you're not careful (or, frankly, even if you are.) Replacing that bar with metal rod, and drilling into the tails, allows you to add them after the fact.
Next step, next set of mis-fits. The nose has a horrible gap all the way 'round, and doesn't match the fuselage sides. Fix this with a lot of putty, then add the antennae. Put a blob of putty at the front of the nose and sand the contour to "sharpen" it.
You'll have a slew of antennas all around the aircraft to add through construction - you may choose to add them afterward, if possible. The two vanes on the sides of the upper leading edge are not listed in the instructions - but are provided, shown on the box, and have holes drilled out for them. Don't forget to add them. (These were added to help airflow over the vertical fins.)
 The flare dispensers in the intakes don't fit. Period. You either have to whittle away to get them to fit, or replace them with putty. There will also be a very visible gap through the intake to the main landing gear well. Be sure to take care of this. Paint the back "wall" of the intake flat black, and paint the interiors of the intakes white (guess who forgot to do this....) Let this set dry, putty as needed.
The vertical fins have their own problems - they look fine, but there are gaps (suprise) between them and the fuselage. The way I dealt with this was to putty the fuselage *before* adding the fins, add them, then quickly remove the excess. It seemed to work...
The landing gear on the real Hornet is a complicated affair, and is dealt with nicely on the model. The wheels, unfortunately, are split - and don't fit all that well together. The tie-down rings fit into the small "dimples" (you really have to look!) on the gear legs. The front gear was not a problem, actually, and went together rather well.
For the most part, the rest of this kit is adding "fiddly bits" - gear doors (wait until after painting, if you're going to add the drop tank,) antennae, armament, underwing actuators, and the tail hook.
I didn't add the armament on this yet - I'm still undecided as to if I will or not. One set of underwing pylons, and the sidewinders on the wingtips, most likely. If you're going to add them, wait until after painting. (There's some discussion as to if the underwing pylons are shaped properly or not. I'm not a Hornet expert, so I'm not going to sweat it.)
Painting - I was originally going to do this in the kit-provided scheme for the USS Eisenhower (a carrier my brother served on.) However, I found myself lacking some essential ingredients - namely, the right colors. In addition, I wanted to get this done for the end of the A.R.C's contest (which ended Feb 28 2001.) So, I did what any desperate person would do - I improvised. (Besides, I think the grey-on-grey schemes look a little boring.) I decided to create a "modern" version of the WWII - era tri-color scheme used by the US Navy - white undersides, medium blue fuselage with dark sea blue uppers. I tried to disrupt or soften edges wherever I could - and it turned out a bit better than I expected. (As you go around the model, various parts "blend in" to each other to disrupt the shape - you can see some of this in the photo nearby here.) Maybe I could interest the navy... nah. This was actually mostly hand-painted- the white is from a spray can, and was used as a primer throughout. I also used this on the landing gear legs, doors, and just about anywhere else. It dries reasonably quickly, and didn't react to the acrylics I used (Pollyscale) at all. I'm definately going to use it more often. After painting, I did some detail work on the landign gear doors (red edges,) legs (printer-refill ink "wash") and bays (drybrushing to bring out some detail,) as well as re-metallizing the exhaust nozzles and gun "plate" above the radome (and other little bits here and there.)
Once all that was dried, I used kit decals for the Independance - they're the regular low-viz grey, and look interesting on this scheme to say the least! I was going to use aftermarket, "full color" decals, but they would have blended into the blue on top a bit too well. Unlike some kits, this one doesn't go "stencil-crazy." There are some, but it won't take you hours on end to get through them all.
All in all, this isn't a bad kit. It's not fantastic, due to the fit problems all over the place, but for $10 at Wal-Mart, I'm not complaining. Hasegawa makes one that fits much better, but it costs four times as much. I wouldn't reccommend this to a new modeller, but once you have some skills under your belt, you can make this into a fine replica. Somewhat reccommended.