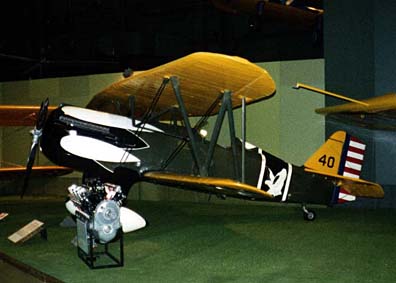
Curtiss P6E Hawk
|
|
|
|
|
|
|
|
|
Curtiss P6E |
|
|
|
|
|
5 |
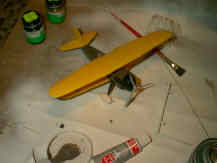
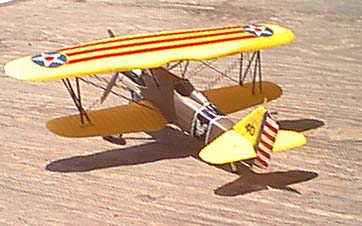
The Curtiss P6E Hawk was developed in response to an early 1930s Army request for a pursuit fighter. The Curtiss company design for a biplane fighter was accepted, and is the genelogical father of the P-36 Hawk/P-40 series of aircraft.
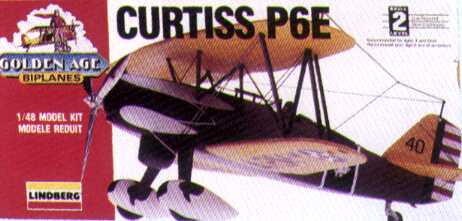
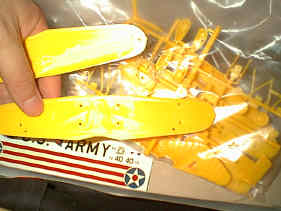 The kit itself is a very simple affair moulded in a very
bright
yellow plastic. The external detail looks workable, though somewhat
simple (what do you expect for $6 these days.) The internal detail is
nonexistant, for all practical purposes, and will need to be
scratchbuilt.
Lindberg did, however, provide a length of stiff wire to use in the
rigging process, and provides decent looking (though slightly yellowed)
decals. Some thinning and scratchbuilding will be neccessarry, no
question
about it. Some correction will also be neccessary, as the upper wing
seems
to sit far too high above the fuselage. (See the photos of the kit box
and
the actual aircraft at the top of the page.)
The kit itself is a very simple affair moulded in a very
bright
yellow plastic. The external detail looks workable, though somewhat
simple (what do you expect for $6 these days.) The internal detail is
nonexistant, for all practical purposes, and will need to be
scratchbuilt.
Lindberg did, however, provide a length of stiff wire to use in the
rigging process, and provides decent looking (though slightly yellowed)
decals. Some thinning and scratchbuilding will be neccessarry, no
question
about it. Some correction will also be neccessary, as the upper wing
seems
to sit far too high above the fuselage. (See the photos of the kit box
and
the actual aircraft at the top of the page.)
Building the kit
This is not what I'd consider a "first" or "second" kit -
maybe "fifteenth" or so, when you can deal with nonsense.
The cockpit is not very detailed - in fact, outside of an
instrument panel, it has NO detail. The pilot figure is, possibly,
usable - but mine had a huge hole in the gut. I didn't really want to
use him (though I had a P-51 pilot I could probably have used,) but
that would have left a huge "hole" as a cockpit. I couldn't find much
as far as detail shots of the cockpit, though, which was a liability...
I scratched up a basic floor, and a control stick out of a
clothespin. The floor was out of box cardboard - and set just in
front of the locating "slot" for the seat, then angled slightly to set
above the wing slots. Not fancy, but slightly better than nothing.
 The fuselage got put together pretty quickly. You should
put something up front to block the intake. Guess who forgot to... it's
now blocked with the propeller. The "turtledeck" needed a little
sanding - the bottom of the fuselage needed a good bit of sscraping and
sanding to get rid of the seams. The tailwheel's kind of a pain - it
doesn't have a whole heck of a lot to hold on to. Be careful with it.
The fuselage got put together pretty quickly. You should
put something up front to block the intake. Guess who forgot to... it's
now blocked with the propeller. The "turtledeck" needed a little
sanding - the bottom of the fuselage needed a good bit of sscraping and
sanding to get rid of the seams. The tailwheel's kind of a pain - it
doesn't have a whole heck of a lot to hold on to. Be careful with it.
The wings themselves go together easily. Check and make
sure they're not warped. There are two large "lugs" on the ends of the
main wing that I was expecting to get in the way - they are acutally
supposed to be there, yes. There are holes for them in the other half.
I still cut them off, and taped the wings together. Once set, I
sanded the top of the top wing (OK, I'm a bit lazy) to lessen the
"roadside ridge" effect of the "fabric" surface. (You know the ridges
I'm talking about... if you try to pull over, you get that low "grind"
noise through the tires.)
So far, so good - after this, the model got to be a pain.
Partially because OF the model, and partly because of my inexperience
with biplanes.
First, I realized I had to paint the fuselage and varied
and sundry parts early - such as the wheel pants, gear legs, and the
rest. Thinking ahead (sort of,) I decided not to paint the wings. Yes,
they still look plastic-y, but I wouldn't have paint getting torn up by
glue during assembly and rigging. So, I primed the fuselage with
white primer (the only thing I had at the moment) and then painted it
olive drab. Looking at the decals, I realized I had to paint the nose
black.
I *didn't* think of applying the decals while the struts
and such were off. BIG mistake... we'll get to that. Live and
learn. Though to be honest, the decals might as well be replaced,
or painted on.
 The fuselage and wings sat like this for a little while. I
then attached the lower wings to the fuselage, and tried test fitting
the struts and upper wings. The fuselage struts work reasonably well,
even if they don't sit all that securely in the fuselage itself.
Supergllue will be your friend here. The interplane struts (those
between the wings, if you're unfamiliar with the term) were an
adventure in and of themselves.
The fuselage and wings sat like this for a little while. I
then attached the lower wings to the fuselage, and tried test fitting
the struts and upper wings. The fuselage struts work reasonably well,
even if they don't sit all that securely in the fuselage itself.
Supergllue will be your friend here. The interplane struts (those
between the wings, if you're unfamiliar with the term) were an
adventure in and of themselves.
I initially test fit the struts and noticed - well, that
they seemed long. Actually, let me back up. There are a group of three
holes for thestruts and aileron - support or whatever it is - on the
wings. I started test fitting these, trying to use the outermost set of
holes for the interplane struts. Big mistake. When I did
this, the upper wing was cocked about 20 degrees "up" from the lower
wing - very wrong, indeed. So, assuming I was right (don't laugh) I
started trimming the strut.
It still didn't fit right, seeming to twist.
I turned the strut around and tried that way - no, it
doesn't go that way... By sheer coincidence, I ended up with the lower
end using the *inboard* locating hole... where it's supposed to
be. Yes, the struts angle in that much, and yes, the independant
support does 'cross" the line of the interplane "N" strut. This
led to another problem... I'd trimmed the strut, so it's now NOT
reaching the wing.
By exactly the amount I trimmed it by.
To add insult to injury, as I was trying to get these
things glued on, on one wing the locating holes seemed *way* off. I
couldn't tell why, as they lined up just five minutes before!
Turns out the lower wing on that side was still LOOSE. After a bit of
foul language, I glued THAT back in and let it set, then went back to
work on the top wing. Many "veteran" biplane builders mention
making a jig out of cardboard, scrap plastic, etc. for the upper wing -
I'd say, "Good idea." Fortunately, by this time the fuselage struts
were solidly in place and held the wing where it was supposed to go...
a lucky mistake, but one I'll try to repeat in the future, I think.
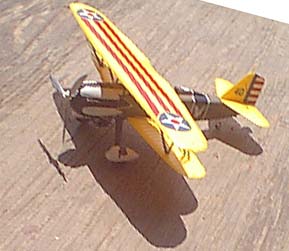
The wing struts were "re-lengthened" somewhat by adding in some scrap plastic. You'll note there are no pictures of the top of the struts. They look, to me... awful. But they keep the struts where they're supposed to be.
Once all that was done, I got around - finally - to doing the landing gear. This is another pain. The spats were painted with white primer, and put to the side. The landing gear legs have vague holes in the side of the fuselage where they're supposed to go - and one side didn't want to during the dry-fit. I carved out the holes, trimmed the location tab, until it was "close enough." I then test-fit the spats to the struts.
Ugh. Horrible fit.Fortunately, no gluing was in progress at this point. I put these to the side for a bit, after sanding the seams and re-priming.
Decals
Yeah, I started on decals now. Why, I don't know. It was too late, as I learned with the front decals. The decals on this kit might as well be made out of construction paper, at least for the front. The oens on top and bottom of the wing, on the tail, and even (somewhat) around the fuselage went on decently and seemed to react well to the setting solution. The ones on the nose refused to do anything close to conforming. Eventually, I trimmed off a lot of the black areas, cracked a few decals in a few places, and got them (given the frustration level) "close enough." IF I build this kit again, I'll just paint the damn markings on... They got close, and got touched up with some paint, and were declared "Good enough."
There are decals for the "talons" on the wheel spats. I drew those on with a black Sharpie marker, not wanting to deal with trying to get the decals around them, then trying to glue the spats on. I then glued the sspats to the struts, fit the wheels in the spats (it can be done...) and glued the struts to the fuselage, then let it dry. One of the spats is crooked - it's the closest to "really fitting" I could get it to do. It was either too far in or out, otherwise. Did I mention the frustration level?
Then came the fun part...
 Rigging
I mentioned, I believe, that Lindberg gives you wire for this. Not quite enough, but they do. Some of the "not enough" was probably due to errors on MY trimming, I'm sure. Just don't plan on using it for the antenna wire (which I noticed... I don't have on at the time of the pictures.) Wire is good and bad. Good in that it's stiff and doesn't really require holding. Bad in that it's hard to cut and seems to be a pain in the butt with glue - even superglue. Yes, I fudged the rigging a bit. If I'd have known the upper wing WOULD fit, I might have just set it in place while the struts set, then left it off, rigged the struts to each other, and reattached the wing. It wouldn't really be 100% accurate (the rigging actually ends just inside the struts on the wings,) but it'd have made getting TO the wires easier!
Mistake 1- I put in the two front lines (from upper-front strut to near the landing gear leg) first (well, first on the wing - I did the fuselage to upper wing struts first. Easy.). DON'T do this! Start with the middle wires, while the area's accessible! (Yes, I fudged here, too, there's only one wire,due to frustration with pliers - I have no idea where my tweezers have gone.) THEN do the front and back wires, which are easier to go to. And doubled. Ideally, you'll have some dividers, or SOMETHING to measure the wires with. I got a pretty close "best guess."
This process led to a good half hour (at least) of swearing at little metal wires. But... it got finished. And then I realized... after calming down, of course - that I had just... rigged a biplane. Even with a PITA kit like this, it does give a feeling of accomplishment. Of course, I then realized I forgot to do the tail, but given that it's all out in the open and easy to get to, it wasa piece of cake... 'til the wire popped out somewhere after a cut. I have yet to find it, so my tail has only one rigging wire on each side. Oops. Well, it's not going to a contest anytime soon, anyway.
This kit does have a few things left to do - the antenna posts on the upper wing, and the antenna to be run (wing to tail to wing, with another line heading into the fuselage.) Also, I have to recreate the "tube" gunsight... I have no idea where it popped off to... and once I get some clear sheet plastic, try to create the missing windscreen. Where THAT went to... who knows.
Would I build this again? Eh, for some reason, I might. Much later. Could I reccommend the kit? With the Classic Airframes kit out, I doubt it... yet for $5, if you can deal with the problems, it's much cheaper. Get a good bit of experience (prior biplane experience and/or scratchbuilding suggested) before you try this kit. Or just ignore the rigging, put the decals on early, and have fun throwing it around the room. Not highly reccomended as a kit, but it's buildable with work.