 .
.
.
|
|
|
|
|
|
|
|
|
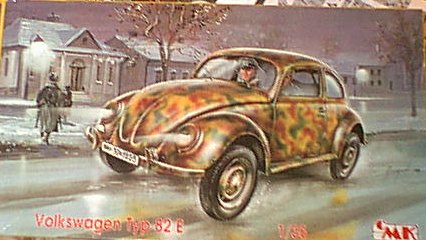
VW Typ 82e |
|
|
|
|
|
|
The VW Beetle is well known throughout the world, being immensely popular in the US and a huge sales hit, primarily because of its low cost, fuel economy, reliability, and ease of maintenance. Even after production was stopped by Volkswagen, it continued in central and South America until just a few short years ago.
The one thing most people don't think about doing with a Volkswagen is going to war in it. However, given their original creation by Prof. Porsche in the mid-30s as a "people's car," it's not actually suprising to learn they were used in WWII. I haven't been able to find much on them, other than their being used as staff cars on occasion, but I don't think I'll run across scenes of waves of VW Bugs rolling into battle. They don't have much armor, and don't have the power to haul armor plating around anyway... Thy Typ 82E actually ran on Kubelwagen gear (the chassis) instead of the original civilian chassis, and had slightly higher ground clearance.
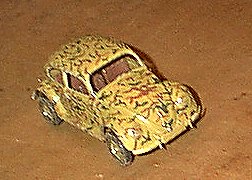
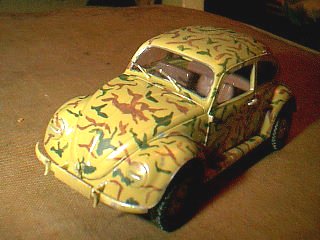
The CMK kit came out a few short years ago. Being married to a VW fanatic, when I saw this kit (and a different variation,) I had to pick it up. It's 1/35 scale, so the already small Beetle looks positively tiny! This comes with two schemes - a black "staff" car (with what appears to be Japanese emblems on it!) and a camoflaged Bug (Panzer yellow, red-brown, and green.) I chose to do the camo version of the car.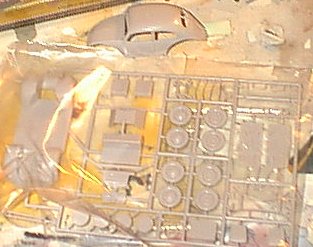
When you open the box, you see why it was so light. You get one grey sprue, one clear sprue, and the body shell. There are not a lot of parts to this kit - enough to make a decent representation, but CMK also happens to make interior and exterior resin detail parts for these kits. I'd say it's a good idea to use them if you're making a contest model, perhaps, but there just wasnt' a lot in this car to begin with. (To see what you get with the resin set - also sold as an "upgraded" kit, go to this Modeling Madness article.) You do get two sets of wheels - a basic set for the camoflaged car, and a "dressier" set for the black 'staff' car.
I started out by prepainting what I could. I decided, as I mentioned, to do the camo version (I have other VW kits in the "usual'" auto scales to show off the civil versions.) First, though, I needed to get rid of the huge lump on top from molding. I trimmed it with some side cutters, got it closer to the top with my hobby knife, then sanded it with 350, then finer grits of sandpaper until all evidence of it was gone. Perhaps 5 minutes of work, and you can't tell a "pip" was there at all.
 The biggest area of work is in the same vein - cleaning up mold points on parts. The worst spots are on the tires and on the bottom of the chassis - but it isn't exceptionally hard to clean up, you just need to be careful with it.
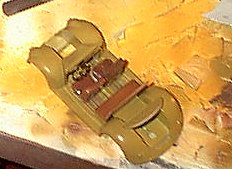
After this came some pre-painting. I attached the headlights (they're mostly blanked out,) then sprayed just about everything with a coat or two of Testors Model Master Enamel - Dunkelgelb (dark yellow.) The body needed two or three coats, as did the chassis. Everything else is pretty well hidden inside (well, except the wheels, obviously.) The seats were painted Red-Brown and had a slight bit of "weathering" with black ink and pastels. The floorboard, too, was weathered with brown pastels for a somewhat muddy, dirty look, as well as being highlighted with silver artist's pencil. The rear bench sits on some structural members, all of which fit well and were easy to locate. The front seats sit on metal "frames," painted with Model Master steel metalizer. They were assembled and allowed to dry - it's not a positive fit, so let it dry, and fit the seat backs on (they just sort of "hook" on the sides, there's no placement guide.) The center tunnel and rudder pedals were installed, the gearshift and brake painted and installed on the tunnel, and then the seats were put in. The instructions have you paint all of this Dark Yellow (or grey, depending on the version you're doing.) I added some metal, silver pedals, and a little color here and there to break up the interior. You can't really see much through the windows... The dashboard is very basic. Just a black panel in the middle which held the speedometer. I painted this, and added the steering wheel and column.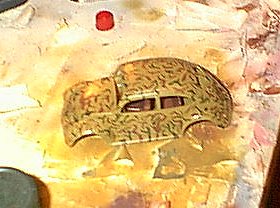 Once all this was in, I started test-fitting parts.
The underside doesn't have much - two side axles for the rear, and a front bar and panel. This is a "curbside" kit, so there's not much engine detail. I decided to work on that last, and just highlighted the bottom of the "engine" with metalizer, as well as some pastel and silver pencil "weathering."
The instructions would have you glue the interior door panels to the body shell, then fit that over the interior and chassis. It works out better if you fit the interior side panels to the chassis first (they fit nicely along the ridge provided,) then fit the body shell on top. I didn't even have to glue the body shell - it's a tight fit. The glasswork fits on the outside, not the inside - but don't forget the rearview mirror! (Guess who did, and had to work carefully with tweezers to fit it in through the side.) Just for the heck of it, I painted the disruptive red-brown/ olive scheme on at this time. It doesn't look all that bad, given the size, and given that it was done by hand.
I next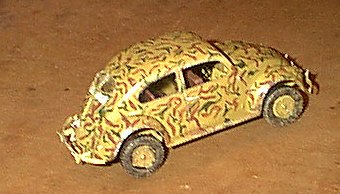 fit the wheels together, gave them a quick black wash to bring out some detail, painted the bolt heads silver, and put them aside until after weatheringt. Let the rear axles dry - they don't lock into anything, just rest in two channels proivded. I let this dry, then added the glasswork (which is beveled, and fits easily in the openings.) I left the door glasswork off - the clear plastic is very clear, but I wanted to leave this off for a more open feeling. VW fans will appreciate the split rear window. I finished off by adding the bumpers and the various handles.
Last thing is some weathering. This is, after all, a car, not an airplane, and should be somewhat dirty! I ground some pastels together, and made up some thinned white glue. I got a little of the glue on a brush, ran it through the pastels, and "spackled" the inside of the wheel wells, the botttom of the car, a bit of the fenders and running boards, and of course the wheels and rims. It's hard to see, as the color's somewhere in between the dark yellow and the red-brown, but it is there (you can at least see it on the tires!) This seems to work all right, though I may want to make it more visible later. I then "chipped" areas of the fender, bumpers, and doors with silver paint. Once all this dried, I attached the wheels.... and had a tiny VW.
This is not a hard kit to assemble, but takes a little cleanup. If you want a slightly different looking VW kit, this might be one to look at. It can be knocked out in a day, and has no real vices. Reccommended to any one who can handle model glue.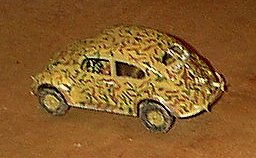 (Oh, yes, I did add the windshield wipers afterward.) It's a little different from what I usually build, and frankly was fun. I'm looking forward to the other CMK VW Bug kit.
Other links:
Pictures of a restored 82e available here.