
| Kit | Kit Manufacturer | Scale | Price | Options | Out of Box or Modified | Rating (1-10) |
| L89 Corvette | Revell | 1:24 | Est. $6-$8 in 1989 | - | 6 |
I had more info on this once. I built this kit years ago (1989 or so) and at the time was proud of it. Over the years, though, as my skills improved, I kept looking back and wanting to... improve it, fix it. The kit itself is no longer available, so my only option was stripping it and starting over, as much as possible.
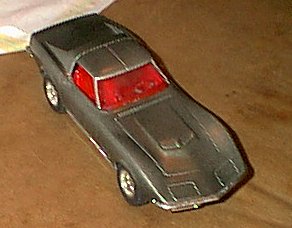
 When originally built, Revell and Monogram were seperate companies. I loved Monogram and AMT kits. Revell's Corvettes, though, never seemed to want to fit properly. Even looking at the parts now, it wasn't completely a lack of skill that kept them from going together well. I'd built this pretty much straight from the box - detailing wasn't big on my list at the time. The instrument panel was painted black, and all the detail remained hidden. The interior was spraypainted white (because it "looked cool.") This yellowed soon, partially because of the paint, partially from dust. The body was painted black, with a metallic maroon over it (I did the same finish on the mid-60s 'vette as well.) That was the only part I was happy with, except for the dust and blotches in the finish. It also tended to turn the surface details ("Stingray" script and "429" emblems) into blobs, if they were visible at all. The final bit of insult was getting glue on the bottom of the windshield - partly due to the poor fit. I "Fixed" this at the time by painting the BOTTOM half flat black.
Needless to say, this was a mess. Finally, I decided it was time for a restoration project.
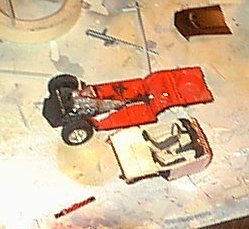 What could be taken apart, was. The engine was seperated, as was the exhaust, from the chassis. The interior pretty much fell out (and showed yellowing and excessive use of superglue.) The front windshield cracked - leading to adventures in "heat and smash" forming (more on this later.) The rear suspension fell off, the firewall detail came off easily... oy.
This is going to be a project
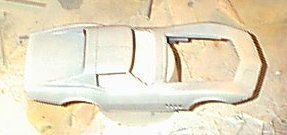
I started off with the body. After a good bit of sanding, most of the "dust" was gone, some of the emblems showed up again, and in places I got down to the original orange (!) plastic. I gave this a shot of white primer, found some dents and dings in the body, fixed them, then - to cover that godawful orange - hit the body with grey primer. THAT covered it. I took care of the hood the same way.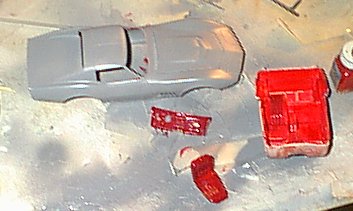
Next up was the interior. Some of this came apart - one seat came out, the dash pretty much fell apart. This was primed, and repainted - I have to find a way to match the seats, as one did not come out of the interior, so was primed slightly differently. Also, these need seat belts. Badly. Should be easy to scratchbuild. Painting the details are not all that much fun when everything's already glued in place! Still, I managed - some detail, some silver trim. Given the small windows, it should work.
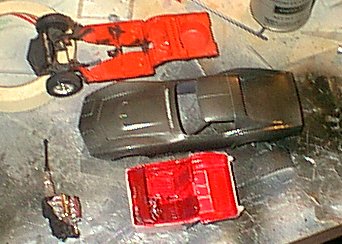
The body was in the paint shop at this point - Grey primer first, after finding all the dings and scratches of 12 years or so. I gave it a first coat of silver metallic, then once that had dried, a coat or two of graphite metallic. Together, they come close to a "steel cities grey" - one of my favorites for this body style.
The engine and transmission/driveshaft came out reasonably easily. As you can see in the pics, they didn't have a great paint job when I first built this ("It's an engine, why would it be red?" I believe was my thinking at the time.) This is going to need fixing and cleaning - the next part of this project.
I reworked them, painting the engine block red, oil pan a kind of dirty grey (I didn't want to go with a metallic at this point, if I were building a new kit, I would.) The distributor is missing, I'm going to have to go on a parts box search for a replacement, and rewire the engine. Fortunately, it's easy to get to.
 While that was getting done, I glued my recreated windshield to the body (as well as the rear window.) There's not a lot of area to glue this to, and the curvature was a little off - probably due to the crack that was in the windshield. Letting it sit, it got where it was supposed to - mostly. I have ot find some non fogging superglue and tack in one corner. The rest was trimmed, and set in place. I also reattached the firewall to the interior tub.
After all this had dried, I mated the interior to the body. I also re-attached the engine to the chassis, after doing some highlighting work with silver pencil. (Looking at this afterward, you really can't tell... oh well.) I considered repainting the exhaust pipes and mufflers, but they weren't in bad shape. I have this feeling there were chromed exhaust tips, though, as they just don't come out very far. This is something I'll have to recreate once I find the right size tubing. I checked the rear suspension as this dried - again, not a heck of a lot to do without possibly causing more damage to the parts than I wanted to fix. This was reattached in place - and more securely than it was previously. 
The top was now mated to the chassis. There was no problem getting this to fit in properly, as I seem to recall their being when this was first built. With the two mated (not glued, suprisingly) I added the chrome bits. The rubber band in the picture below is there for the chrome rocker panels, actually - they got slightly bent. The front and rear bumpers were reattached after painting the turn signals up front with a translucent turn signal amber. After all this had set, I gave the side marker lights and rear brake lights a coat of silver to prepare for detail painting, and painted the door handles and locks silver.
You'll notice there are no emblems - the "427" still isn't on the hood, the "Stingray" on the side is still weak, etc. I'm looking for a better way of replicating these - after sanding, priming, and painting, they just weren't detailed enough to go over with paint or artist pencil. But for now, though it's no contenst winner, it's done, and looks better than it did. I'd love to find another copy of this kit, and start from scratch.
