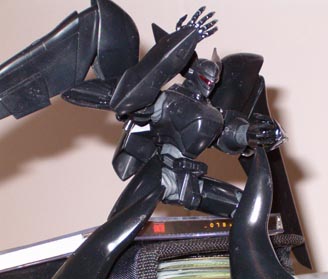
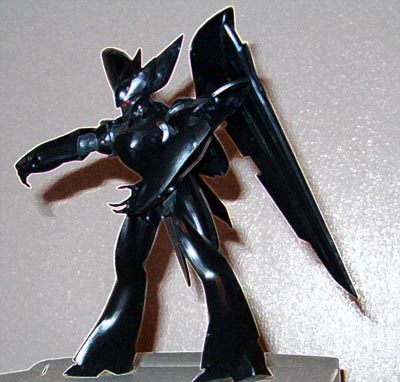
Patlabor TypeJ9 Griffon Labor

Patlabor TypeJ9 Griffon Labor

|
|
|
|
|
|
|
|
|
Griffon Labor |
|
|
|
|
|
|
All right, I can't tell you much about the kit or series at the moment. Patlabor is another ongoing mecha anime series. Essentially, mecha were created to help with construction and such - and morphed into help with police work (Patlabor = Patrol Labor, "Labor" being the generic name for Mecha in this series, much like "Mobile suit" is in Gundam) and military work.
Fitting its appearance, this is one of the "bad guy" suits, apparently a test vehicle another organization is trying to drum up interest in. It attacks the Patrol's newer suits. There are different types - this model shows a flight-capable version. There's also a water-capable version, though I didn't see a kit for it. (I've seen them built online, and I like the wings better.)
I picked this kit up just because it looked interesting, was cheap at $10, and was decidedly non-Gundam.
The kit itself is 1/60 scale - if you're used to the huge boxes for Gundam kits, the small size of this one will suprise you. It's about the sise of a larger 1/144 Gundam (the HG-UC series,) or a smaller 1/100. I have a  Sazbi and the box is about 2 inches shorter, not to mention thinner.The instructions say the labor is 8.55 meters tall. Converting to centimeters, and dividing by 60, this kit should end up 14.25 centimeters, or roughly 6 1/3 inches tall. Glad this wasn't 1/144!
Opening it up, the first thing you see is... a poster. This is actually the instruction sheet, with a poster of the mecha on the other side. A rather neat touch, actually. I wish they'd do this with some of the Gundam series (such as Wing Zero Custom, at the end of Endless Waltz...) Moving that out of the way, you end up with two clear plastic bags full of black parts. One of the bags has a small, clear red sprue for the "eyeslit" (for lack of a better term.)
The third clear plastic bag, smaller than the others, I found interesting. It contains a few vinyl parts - three, to be exact. Some trimming will be required on these. The Griffon design has several open areas, and these are essentially "sleeves" to go over them. With the dark grey vinyl against the black, it's going to give it an interesting look, not to mention keep it from being very monotone. Mask carefully if you paint this finished kit.
There are no decals with the kit, but this is a good thing - the only colored areas are recessed, and would not be served well by decals. They should be easy enough to paint, though, given that the areas are recessed. You'll probably need to get some flat white paint in first, to let the red-orange markings actually show up in the recesses. Priming is not an option against dark plastic.
Hopefully, I'll manage to get this built soon. I need something to display at my desk at work.
The first thing to do is trim out all the "domes" on the vinyl pieces. These are where the various parts' connectors come through. You can get most of them with carefully used scissors, you just need to be careful when near the base of the part. I'd also heard tales of the plastic becoming "brittle" when in contact with this vinyl- I wasn't so worried about the outside, but the joints would be a worry. I painted the inside of the vinyl with some clear Tamiya blue I had sitting around (not used in years.) It should present enough of a barrier... I hope.
You then start on building the arms. These went together very easily, and the inner links fit through the vinyl "sleeves" with no problem (of course, 'ts a basic "L" shape.) The only complaint I could possibly give here are that there are ejector pin marks in the hands, and the hands don't stay attached all that well. (They're non-poseable hands, all you can do is rotate them at the wrist.) A little electrical tape "ship" will do wonders here, if needed. The rest of the structure and armor fit over the vinyl without a problem.
The feet and legs came next - The feet seem like they should be "handed" (one left, one right) - and after build, it's more apparent they should be, but they don't seem to be.It's got an interesting ankle joint - sort of two piece. I'm not sure why it's set up like this, other than giving it some reach to get below the "cuff" of the lower leg plating.
The "hip" and inner leg structure was the next point to tackle. Building the individual pieces wasn't that difficult. Fitting them into the vinyl, though? I was sure I'd tear through it up top (with the inverted "T" hip joint attachment.) If you trim about 1 mm / 1/16 in. off each side, it goes in much better. The key for this is to trim the tips of the hip "T" off, fit it in, then work on sliding the upper leg's polycap connector on...by feel. It's not so bad, actually. Oh, by the way, watch which way you fit the "T" in - this is the most position - sensitive portion. The connector for the "crotch" of the unit fits here, and are aligned differently for the front and the back.
After this, once more, it's fitting the overlying "plating" on the vinyl. Not a big deal, and you've got yourself a pair of arms and legs. For what it's worth, I was using liquid cement to attach almost everything that wasn't supposed to move.
Next came the head. Two sides, a top, and a red eyepiece. The red eyepiece takes a little looking to figure out exactly how it fits in - it's "almost" obvious, but it's such an oddball shape, I found myself double checking. Make sure all pins are trimmed of any excess plastic - I missed one "pip" and coudn't get this to close, having to tear it apart and check all of them again. Having the skullcap piece eliminates one potentially annoying seam.
The head slots into the body, which is what you assemble next. Two pieces for the shell, plus connectors inside. I still seem to have a seam in there, and coudn't find just where to trim to eliminate it. It's a small seam on one lower section, and you can't really see it - but it annoys me just the same. The head retains a little mobility in the body, fortunately.
 Lower legs and arms were slid into the body at this point. Almost finished...
I built the "tail" and fit it in. No problems. The tail is s