|
|
|
|
|
|
|
|
|
P-36 "Pearl Harbor Defender" |
|
|
|
|
|
|
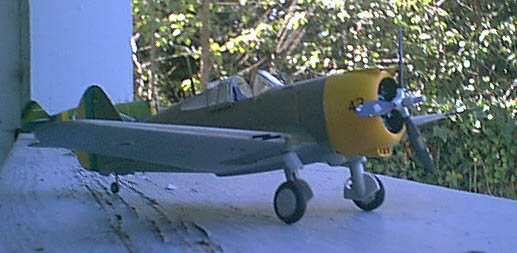
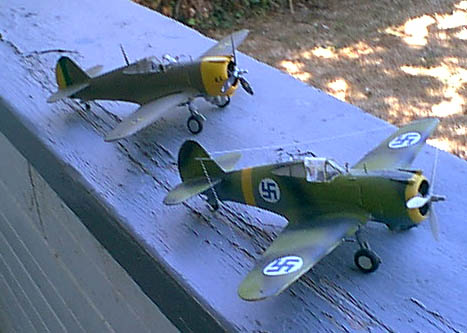
The P-36 (or Hawk 75 as export versions were known) was the predecessor to the P-40. A modern, fast, low-wing monoplane fighter in the early to mid-30s, it was already considered obsolescent by the beginning of the second world war. Still, due to low cost and good marketing, they were used to good effect in many countries. France had a number of them to fight off the German invasion, and they gave a reasonably good account of themselves. Captured examples were sold to Finland by Germany, who used them with great effect against the Russians. And at Pearl Harbor, P-36s that had been relegated to gunnery training duty, armed with only one .30 caliber machine gun, were among the only US aircraft to take off and fight the Japanese, scoring several victories.
 This is one of the Hobbycraft kits, namely the P-36 "Pearl Harbor Defender." I've finished this in both a temporary scheme from the 1939 Cleveland Air Races, and later repainted it to represent a Hawk 75 serving with the Finnish air force. Hobbycraft made and makes several variants of this aircraft, including a French Hawk 75, the British Mohawk, the Hawk 75 M/N/O (which I've just received and haven't had a chance to build, though it provides the most variants,) and the latest boxing for "Allied Hawks." Hobbycraft is the only manufacturer currently making 1/48 scale kits of the P-36. AMT used to, though they haven't been out in a long time. Several manufacturers make them in 1/72, and Craftworks makes a beautiful resin P-36 in 1/32 scale.
I've reviewed this kit before, so I'll just hit some of the highlights:
Construction
This is one that you will need to plan out somewhat in advance. You'll also have to dig out your references, as it has one of Hobbycraft's typical weaknesses - poor in-build documentation. It's got a somewhat weak interior (there are aftermarket sets for this, and in a pinch you could use one for an early P-40.) It gives no color information for the interior - and given the era these were built in, this is somewhat of a liability. If you go with the USAAF aircraft, "bare metal" (aluminum) should work. I'm not sure if the Brazilian example is painted or not, so I gave some of it an interior green finish and left the area behind the windows as natural metal - it's probably not right, but it breaks up the solid color topsides. I picked out and highlighted some of the bits and pieces on the sidewalls -  not that you can really see them all that well - and worked on the instrument panel, as it is visible through the open canopy. Again - for the interior, dig out your references - or guess.
The fuselage goes together reasonably well - I didn't have to do much sanding or scraping to get it to fit. Be sure the holes for the gunsight are open if your aricraft had them. Same with the aerial - if your aircraft had IT, or the DF "football" fairing. Have I mentioned you should check your references?
I started varying from the assembly sequence around here. The cowl is a pain to work on if you don't plan ahead, since it comes in two halves, seperate from the fuselage, and has two cowl machine gun mountings which will make it difficult to sand any seams if you don't think ahead. It has to be moulded this way, however, since it bulges out to enclose the engine. If you build an aircraft (such as this one) that has a seperate color cowl (more on this later, by the way,) you can leave the cowl off, paint it seperately, and attach it later. If it's the same color as the rest of the aircraft, go ahead and follow these slightly modified instructions. Build the engine, paint and let dry. Put the cowl halves together - yes, if you try a test fit, you'll notice the engine doesn't fit directly through the back. Don't worry about that. Put JUST the cowl halves together, let dry, and do any seam sanding and filling. Once that's dry, add the scoops and cowl guns. The cowl guns sit somewhat proud of the front of the cowl - this isn't really great, though it's somewhat accurate. It's just that they get in the way of the propeller! Set them back somewhat, but look at pictures of the real thing to get a feel for it. (If you want to do a pearl harbor aircraft as it appeared on 7 Dec 1941, they only had ONE .30cal. gun... keep the fairing, trim the barrel.)  If the cowl's a seperate color, paint it and put it to the side when all this is done. If not...
When I built mine, I decided somewhat early on to do this as the Brazilian aircraft, which had the "yellow" cowl (see notes on this down in the Painting section.) The engine is mounted on a small pedistal or standoff from the front of the fuselage. You should NOT glue this to the engine, or you won't be able to fit it in later. Glue this to the front of the fuselage - it makes a handy "handle" for painting later, as well. When you finally attach the engine and cowl, slide the engine into the cowl sideways (it'll be loose) and turn it. Glue the engine to the standoff, and then secure the cowl with glue. It will, as mentioned, make a seperate color cowl easier to paint - though you will have to wait to fit the exhausts.
While I'm talking about the engine, here's the technique I've settled on. I paint the engine black. When the paint dries, I take a silver pencil and lightly run it over the raised surfaces, which brings out the detail and gives the entire thing somewhat of a metal appearance. Last, I painted the cover grey - which was, actually, in the instructions. The wings are another area where you have to figure out what versions you want. You have the optoins of opening the shell ejection chutes (which you should do, unless you do the USAAF version, which uses the underwing "gondolas" for collecting them,) opening up any machine gun ports in the front (check your references - some have no guns, some have one per wing, some have two, and open up the appropriate number of chutes,) and two different pitot probes. The wings themselves go together pretty easily. Just watch the fit on the front "bump" of the landing gear bays.
Leave the tailplanes off 'til after painting and possibly decalling - they fit well, and get in the way of some needed markings.
The wing-fuselage fit wasn't bad. Go slowly and watch what you're doing, and you shouldn't have a gap.
The last thing to add here is the landing gear. Clean up the legs as best you can - they're not too bad, but could use some detail. The worst part are the landing gear doors. I wish someone would do at least the upper doors in photoetch - the kit parts are far too thick, and interfere with each other badly, or push the landing gear legs around. No wheel detail is given - might as well leave them off, anyway. The odd surface on the inside of the wheel bay represents a canvas cover - paint underside color, khaki, grey, whatever. The wheel hubs are apparently grey.
Colors and markings
Did I mention the Hobbycraft instructions had a few things wrong? Or that you should leave the tailplanes off?
I haven't got any hobby shops worth mentioning in this area, unfortunately, and found myself needing neutral grey and olive drab. One hobby shop carries all of three colors, its seems, and those aren't the ones I need. The other has more colors... but old paint. You old hands my remember Pactra paints in the bigger bottles... well, that's what I had to pick up. The colors are good - though the olive drab looks odd, I guess it works for a faded version. It just doesn't thin or adhere well.... as I found out....
That's why I mentioned the tailplane gets in the way. It's not a straight line down - it jumps twice. And if you do the US Army aircraft with red and white tailstripes, you have to paint the rudder white. The provided decal is only of the red stripes. It's also why I mentioned the poor adhesion of the (old!) pactra paint... it pulled off, even with the reasonably weak masking tape I used. Arrrrrrrgh! Quick brush work covered some of it, but it's still visible as patches. Uh.. repairs, yeah, that's what it was...
Anyway, the tail gets in the way. And did I mention to check your references? I wish I'd seen that site earlier, the green and yellow aren't as prominent as they should be.
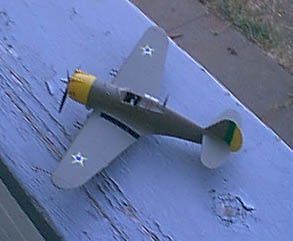
The decals are actually printed well, and they give you several options. The Brazilian markings might be with or without the blue surround, might or might not have the darker "US Army" painted out on the bottom, and could be in four or six positions. (The latter could also go for the USAAC aircraft. Need I say it again... ) I made mine with four positions, no surround, given the profiles on the previously listed page. I may build another as the silver/orange trainer...
For what it's worth, I'd suggest planning a wash and some weathering to bring out the details in this kit. Once everything finishes curing (OK, and I want to work on it a bit more,) I'll be doing so to bring out the panel lines in the cowl and fuselage, and flatten the decals... especially the wing walk stripes.
Conclusion
The kit itself isnt' bad. It's not shake and bake, and you DO NEED REFERENCES (can I say that enough?) The interior detail is somewhat weak, but it's the right shape and outline, and the only still-in-production game in town in 1/48. There are so many variants and color schemes for this little known aircraft, much loved by its pilots for its light controls and maneuverability, that you could build several shelf fulls of them and not have two look alike. If you have a little experience and can handle its pitfalls, go ahead and pick up this kit. It's not for beginners, though. Get 3-4 kits under your belt before you tackle it.
Don't forget the discussion group I run, specifically for Curtiss Hawks!
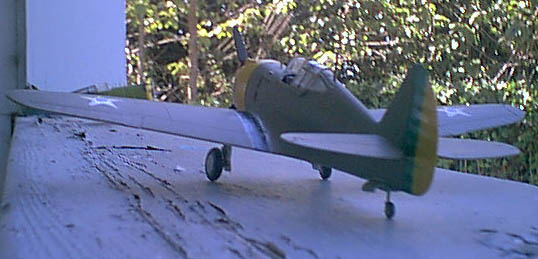 Anyway, I painted, then found a website with nice profiles of the P-36 in Brazilian service which showed something that was bugging me... some markings were missing, such as the prominent green and yellow tail stripes (how could Hobbycraft miss these?) and the tail numbers. HC gives these as four digit serials, when they should apparently be FAB-## format. Oh well. It also noted the cowl should be red, on the seperately colored cowl aircraft. Oops, again. Ah well... Mask the tail, and hand-paint the green and yellow stripes.