"It's a loud airplane, isn't it..." - Mrs. McCann

The KI-61 and radial KI-100 family portrait
"It's a loud airplane, isn't it..." - Mrs. McCann
The KI-61 and radial KI-100 family portrait
|
|
|
|
|
|
|
|
|
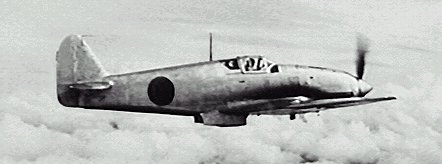
KI-61 Hein "Tony" 244th fighter group |
|
|
|
|
|
|
The KI-61 Hein was a rarity among WWII Japanese warplanes. While most of their aircraft were radial engined, the Hein (Swallow) used a HA-40 water cooled, inverted - "vee" engine - a license built variant of the same engine that powered the Me-109 and 110 fighter families, as well as several Italian fighters such as the Macci C.205. In addition, it was designed from the outset to incorporate features such as self 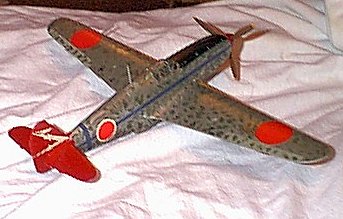 sealing fuel tanks and pilot armor. This, combined with its decent armament (usually some combination of 12.7mm machine guns and cannon) made it a formidable adversary, able to give P-51 Mustangs, Hellcats, and Corsairs a run for their money... when they worked. Unfortunately, the engine could not be produced in quantity, and in the field was prone to coolant system malfunctions and leaks, which kept many Heins out of action. A large number of KI-61 airframes were left to sit for months after the factory which produced the HA-40 engine was bombed. Eventually, Kawasaki was ordered to study a Focke-Wulf FW-190 and modify the airframes in a similar fashion to use radial engines, producing the exceptional KI-100. Had this been done earlier in the war, many more Allied pilots and aircraft would have been lost.
In the box:
When you first open the box, you'll notice there aren't many parts sprues here. This is a kit that can (and will) go together quickly! It consists of 64 pieces in light grey and clear plastic. When done, it won't take much space on the shelf! The kit has been released in several variants, all of which deal with markings. Some parts - particularly the wing sprues - will probably look familiar if you've built the KI-100 kit. This particular kit (JT14:2200) depicts three different marking schemes (natural metal, green mottle over natural metal, and overall dark green over natural metal undersides) flown by the 244th Sentai (fighter group)'s commander, Major Kobayashi. This squadron downed 160 B-29 Superfortresses during World War Two.
The parts themselves were flash free, and showed no major mold marks. Having built the KI-100 (as well as other Hasegawa kits,) I expect this to be a quick build. I will probably not use the decals for the leading edge ID stripes, but will paint them Orange-Yellow. This may be a good place to try using SNJ Spray Metal as well... we'll see. The instrument panel is given as raised detail, but also as a decal. Your choice...
Finishing materials - Numbers shown are for Gunze Sangyo Aqueous, then Mr. Color color systems
| Color | GS/MrColor # | Notes | Orange Yellow | 24 / 58 | Drop tanks, leading edge stripes |
| Red Brown | 47/41 | Interior details, propeller color |
| IJA Green | 60/16 | Not used for natural metal aircraft |
| IJA Grey | 62/56 | Used on control undersurfaces |
| RLM Sandy Brown 79 | 66/19 | Interior color (NOT green or blue!) |
I'd had this kit "calling" me for a while. I'd picked it up years ago when I first got back into the hobby and got into Japanese aircraft, but never 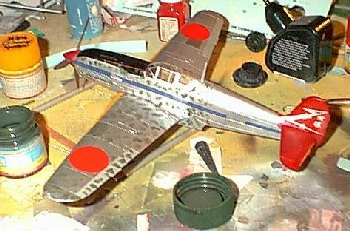 got around to building it for one reason or another. Finally, I decided to just sit down and build the blasted thing already! I thought it might look interesting as part of a display with the ME-109, 110, and Macci 205, all powered with the same engine.
Construction started with the cockpit. I prepainted all the pieces the specified tan color (unusual in a japanese aircraft) with detail painting done shortly afterward. The sidewalls attach to the fuselage sides instead of forming a "tub" as in many other Hasegawa kits.
You move almost immediately to fitting the fuselage together. Put together the underfuselage radiator (don't forget to prepaint it) and the gate behind it. Leave off the front "screen" until the fuselage is together. Mine needed some help here, as over several years and a move or two the fuselage halves had warped slightly. This was quickly fixed, and the radiator screen put in place. Don't forget the instrument panel...
This was allowed to dry, and I went looking through the instructions for subassemblies to work on. There aren't many. The wings were put together, as were the drop tanks. I didn't mess with the landing gear, as it was one of the last things I planned to put on (after painting.) The only other "assemblies" I could find were the rear canopy decking and the propeller. These were assembled and set aside to dry.
Coming back a while later, I fit the gunsight and front fuselage decking, as well as the side intake, to the fuselage. I left the guns and exhaust off until after painting. The decking needed a touch of filler to match up - not much. The wings and tailplane were then mated to the fuselage, and the rear cockpit decking was fitted and allowed to dry. The venturi and underwing intake or generator were fitted as well, as were the mounting points for the drop tanks.
 Looking at the kit, I realized I was actually almost finished! This didn't come as a huge suprise, but I did expect to spend a little more time on the kit. I fit the canopy on, and went in search of masking material. Next stop - the paint shop.
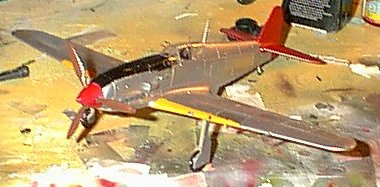
I decided to do the April 1945 scheme - natural metal with a red nose and tail, and green "mottling" on the sides. This is going to have to be a multi-step paint job. On the full size aircraft, the green mottle was put on in the field, and was somewhat crude. Therefore, with this model, I decided I'd do the basic paint job (natural metal, red tail and nose, anti-glare panel, and yellow ID stripes,) apply the decals, then go to town on the mottling, most likely with a good paintbrush.
I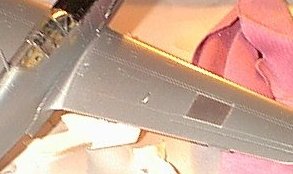 first started with SNJ Spray Metal (Aluminum.) I'd heard great things about this product, and some time back had purchased it in a promotion they were having, with Accurate Miniatures' P-51B Mustang kit. I just had never used it before. There's also a review of it here on the site, but as a brief overview, it's a metal finish. Left alone, it's as good as an enamel silver - somewhat dull, but very smooth looking, and unlike Testors' Metalizer, it can be masked over and doesn't need a sealant. What makes this stuff great is the metal buffing powder they give you, with a buffing rag. Wow... With very little buffing, you can get a great "shine" going! (The shot to the left is just after the first panel, you can see the results in the other "in progress" shots as well.) With different amounts of buffing (and different buffing powders - they also have brass or copper and gold, among others) you can get a great multi-tone metal effect going. I will definately be using this stuff in the future (I have an F-84, F-86, and that P-51 in the wings.) Apparently you can also tint the initial spray metal with oil-based enamel paints, and I've heard you can use the buffing powder on enamels as well. Testing will be done! If you have a metal-finish project, USE THIS STUFF! I was initially worried about it, as the first two light mist coats didn't seem to be coloring the canopy glass... the third one let it be known it was. I also masked over it with no problems, even with "full strength" masking tape, and it took acrylic overpainting with no problems either.
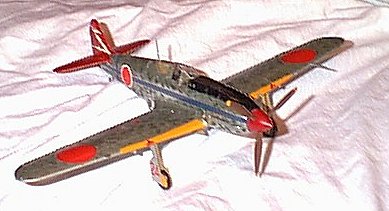
Finished with the base metal, and highly impressed, I went on to the rest of the aircraft. I hand painted the anti-glare panel (and had a little run underneath the masking tape - BURNISH!) with acrylic, as well as the yellow ID bands on the leading edges of the wings. Those were the easy parts... I then had to figure out what to do with the tail. All the metal variants have red tails. If I were to build this again, I'd leave the horizontal tail off until after painting, to ease masking. I masked close to the fairings for the tails, protected the rest of the finish (putting the SNJ to the test with a lot of masking material,) then filled in the detail areas with MicroMask masking fluid. I first tried hand-painting the red... this didn't work too well with the somewhat old red paint I had (it's amazing how many bottles of dry red paint I found!) I cleaned it off, twice, then loaded up the airbrush with thinned acrylic. Perfect! It looked a little too "pink" at first, but darkened correctly as it dried. I then sprayed the spinner with red, cleaned out the airbrush, and painted the exhausts with Model Master Burnt Steel metalizer. Once all this had dried, I hand painted the prop blades red-brown with yellow tips. About this time, my wife came by with the quote near the top of the page (regarding the color scheme) - "It's a loud little airplane, isn't it!" I had to agree - it looked like an aerial circus clown, not a warplane! Still, it adds some color to the colection.
As mentioned - this is a multi-step process. Building either of the metal finish aircraft again, I'd elect to airbrush the blue stripes - this is somewhat of a letdown in the kit, as it seems whoever's in charge of these in the kit didn't actually *measure* the kit! This isn't a big problem on the right side, but on the left, you must work around the supercharger intake with three decals. Get the setting solution out (AeroSol II works beautifully.) The rest of the decals settled in nicely, and I began the third phase - the green mottle.
Using a brush and Gunze Sangy IJA Green, I started "mottling" around the decals. This was a good hour and a half or two hours of work, spread (with the decalling) over two days. On the actual aircraft, this was applied in the field - sometimes with a spray gun, but usually with a paintbrush, or even a palm frond! I pulled out the brush, and started to work on the wing tops and fuselage sides until I was satisfied.
I now have a very... colorful japanese aircraft in the collection! It also completes a "family" of sorts - single DB-601 powered fighters. (I could add the ME-110 and 410 in here as well.) 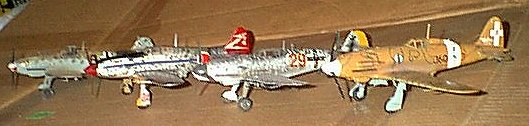
I did hit a few snags with the kit, but I can't say for sure that the build snags were because of the kit and not having it boxed up, packed, and moved several times. Outside of that, the only 'disappointment' was with the blue stripe decals. I can still happily reccommend this kit (which looks good sitting next to its radial KI-100 cousin.)
Other links (will open in new window):
Ashai Journal story
And another on Mark's Japanese Aviation site
Dave Pluth's Japanese Aircraft site